uVersion
English
Download →

Wiki

Quickstart

Your first checkin in under 10 minutes, no terminal.

This page is for you if you are joining a uVersion project and want to start working. Everything happens in the desktop client: no command line to type.

You just need to know your studio's uVersion server address and its port, your username and your password. Your studio admin has passed this information on to you. If they gave you the address without the port, ask for it: it cannot be guessed, and it is the number-one thing people forget.

The vocabulary, in five lines

Read this once: these five words come up everywhere
  • Reserving a file is a checkout: you tell the team you are about to change it.
  • Sending it is a checkin: your work goes to the server and your reservation is handed back.
  • Cancelling is a revert: the file becomes identical to the server version again, and your reservation is handed back too.
  • A workspace is a folder on your disk linked to a repository on the server. You can have several of them.
  • A lock keeps two people from changing the same binary file at the same time: on a .uasset, there is no way to merge two versions after the fact.

1. Install the desktop client

Download the client for your system from uversion.io/downloads:

  • Windows: uVersion_x.y.z_x64-setup.exe. Double-click and follow the installer.
  • macOS (Apple Silicon): uVersion_x.y.z_macos-arm64.app.zip. Unzip it, then drag uVersion.app into Applications.
  • Linux: one command to paste into a terminal, see just below.

On Linux, the simplest route is the install script. No sudo needed:

curl -fSL https://uversion.io/downloads/client/install.sh | sh

It puts the app in ~/Applications and launches it. Nothing is installed system-wide and no administrator rights are requested. Alternatively you can download the AppImage from the download page, make it executable and run it. Details and requirements: Desktop client.

2. Sign in to the server

1. Enter the address, the username and the password

Launch the desktop client. The Welcome to uVersion page asks for three things. The Server address field does not expect a full URL: it is split into three blocks, a non-editable https:// prefix, the host, and the port. The port defaults to 8443, and that is exactly the one people forget: your studio gives you something like uversion.mygamestudio.com and 8443, not https://uversion.mygamestudio.com on its own. If you paste a full address into the host field, the client splits it across the two boxes for you. Then fill in Username and Password, and click Sign in.

The desktop client sign-in page: the Server address field in three blocks (greyed-out https:// prefix, host, port 8443), the Username and Password fields, and the Sign in button.

2. Confirm the server's identity, just once

A uVersion server ships with a self-signed certificate by default. This is the normal case, not a fault, and it is the first thing that trips you up when you are not expecting it. So on your very first connection, the client shows Verify server identity with the server's SHA-256 fingerprint. Compare it with the one your admin gave you through another channel (a message, an internal wiki, out loud) and, if it matches, click Trust this server.

The Verify server identity window: the server's SHA-256 fingerprint and the Trust this server button.

The question is asked only once per server. If it comes back later under the red heading Server identity changed, the fingerprint has changed: do not accept it without asking your admin. Details on the TLS fingerprint page.

Once you are signed in, the client remembers your session. You will not have to retype your password day to day.

3. Get the project onto your machine
The list of projects does not appear on its own: you have to open it.

1. Open the project list

As long as no project is open, the Workspace shows No repository selected and an Open Repository button: click it. If you already have a workspace open, the same window is reached from the + in the tab bar. It lists the projects you have access to, one card per project.

The Open Repository window: one card per project with its name, description and creation date, the Workspace name field under each card, the green Clone button, and at the bottom the Download files after clone checkbox.

2. Check the workspace name, then clone

On the card of the project you want, the Workspace name field names the folder that will be created. Left empty, it takes the project's name. Also check the Download files after clone box at the very bottom of the window: ticked by default, it starts the download right away. Untick it if you only want to create the workspace and fetch the files later. Then click Clone. The button is labelled Clone New if you already have a workspace on this project: cloning a second time is legitimate, for example to work on two content branches.

3. Choose the parent folder

Your system's folder picker opens, titled Choose where to clone <project name>. The folder you choose is the parent folder: inside it uVersion creates a subfolder named after the Workspace name field. So choose D:/Projets, not D:/Projets/MonJeu, otherwise you end up with D:/Projets/MonJeu/MonJeu.

4. Let the transfer finish

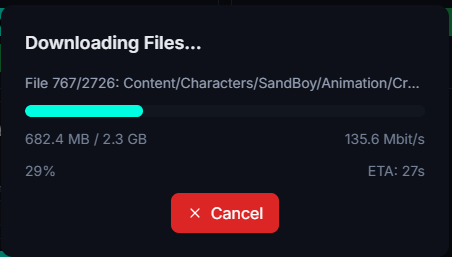
The transfer shows in the client header, with the throughput and an estimated time remaining: that estimate is what counts, since the duration depends entirely on your network link and the server load. You can keep using the client meanwhile, and a network drop loses nothing: the transfer resumes on its own.

The Downloading Files window: the current file, a progress bar, the volume transferred, throughput and ETA, with a Cancel button.

Once it is done, the project is ready to open in Unreal.

4. Edit and send a file

The typical three-step workflow, from the Files tab of the desktop client.

1. Reserve the file

Select the file in the tree. The action bar exists only when something is selected: while the selection is empty there is no button, and this is not a loading state. As soon as a file is picked, the bar appears, preceded by the number of items ({n} file(s) selected). Click Checkout: the file becomes editable, and no one else can touch it while you hold it.

The Files tab with a file selected: the blue action bar showing 1 file(s) selected, then the History, Checkout, Checkin, Revert, Delete and Download buttons.

2. Edit the file

In Unreal, or in any other tool. Nothing special to do on the uVersion side at this stage.

3. Send your change

Select the file, then click Checkin. A window asks for a message: write a sentence explaining what you changed. Sending hands your reservation back and the file returns to read-only.

Special case: a file you have just created

A brand-new file does not exist on the server yet: there is nothing to reserve, and the Checkout button does not appear for it. Select it, click Add, then Checkin.

Special case: the file is already reserved by a teammate

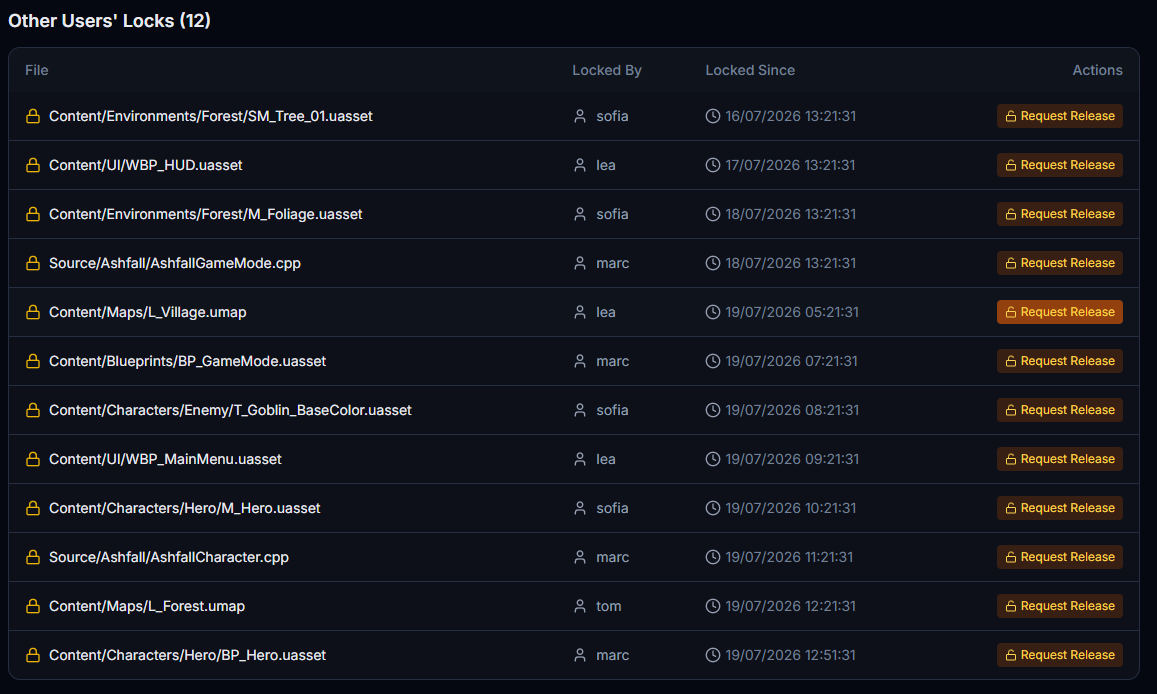
You then see it in the Pending tab, under Other users' locks, with the name of whoever holds it and a Request Release button that sends them a request. This button exists only in the desktop client, not in Unreal.

The Other Users' Locks table in the Pending tab: file, lock holder, date, and a Request Release button on each row.
Why can't I save this file? Project files are read-only until you have reserved them ("checkout"). This is a safeguard: it keeps you from editing an asset by mistake while a teammate is changing it. Do a checkout from the desktop client or directly in Unreal, and the file becomes editable.

5. Work directly from Unreal

The plugin does not come with the project The uVersion plugin is never versioned: you do not get it by cloning, and you must not commit it. It ships as a precompiled binary, and each machine installs the one matching its Unreal version and its system. The desktop client takes care of this: as soon as it spots your project's .uproject file (the file that describes an Unreal project, at the root), it drops the right binary into Plugins/uVersion/. There is nothing for you to do by hand.

1. Open the project in Unreal

From the Open Editor button in the desktop client, or as usual. In the normal case there is nothing to connect: the plugin selects itself as the version control system as soon as it detects that the project sits inside a uVersion workspace. Your credentials are taken from the desktop client, with no re-entry.

2. If the plugin did not activate on its own

Open the Revision Control menu at the bottom right of the editor's status bar, choose Connect to Revision Control, select uVersion from the Provider list, then click Accept Settings.

Unreal's Revision Control Login window: the Provider list expanded with uVersion selected, the green automatic-configuration message, and the Accept Settings button.

3. Reserve and send from the Content Browser

Once connected, all version control lives in Unreal: right-click an asset, then Revision Control → Check Out to reserve it, and Check In to send it.

Unreal's Content Browser: right-click on an asset, the Revision Control submenu with Check Out, Check In, History and Revert, and the Revision Control menu at the bottom right of the status bar.
  • Small icons in the Content Browser to see the state of each asset
  • Blueprint diff available from the history
  • Validation at checkin time, if your admin has enabled rules (they are disabled by default)
Code is not sent from Unreal Code files (.cpp, .h, .hpp, .c, .cs) are refused at checkin by the plugin: they go through the desktop client, which compiles before sending. A consequence worth knowing even if you never touch code: as long as you hold the reservation on a single code file, your content send is refused as well. See the Unreal Engine plugin page.

Next