
Wiki
Create a repository
Creating a uVersion repository: who is allowed to, the two possible routes (admin panel or an existing project folder), and what the server does automatically.
A repository is a server-side project: it holds the history and the files of your production. A workspace is the matching folder on your disk. The two are separate: creating a repository creates nothing on your machine, and the other way around.
Who can create a repository
admin role can create a repository, by any route.
A lead or a project_admin cannot: the server
answers Admin role required, and the client simply hides the
button from them. If you do not see the button described below, it is your
role that is the cause, not a display glitch.
The uversion command line has no creation
command: it can clone and work inside an existing repository, but not create
one. Use the desktop client or the web interface.
Two routes
The choice depends on what you already have:
- You are starting from scratch, or preparing a project the team will fill in later: create an empty repository from the admin panel. It is the only route that lets you enter a description. See below.
- You already have an Unreal project on your disk and you want to put it under uVersion: do not go through here, follow Upload an existing project. That route creates the repository and links your folder in a single move, without relocating anything.
From the admin panel
1. Open the Repositories tab
In the sidebar, open Admin, then the Repositories tab. Mind the right row: the panel has two, SERVER for what concerns the whole server, and PROJECT for what concerns only the repository selected right next to it. Repositories are created in the SERVER row.
The header shows the number of active repositories. On a fresh server the list is empty, and the + Create Repository button is at the top right.

2. Open the creation dialog
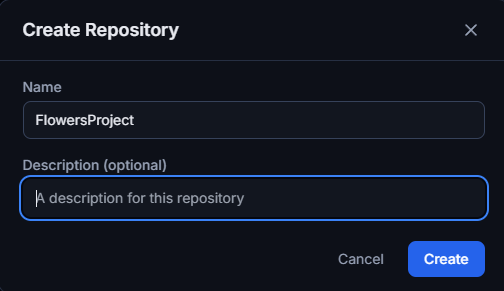
Click + Create Repository. A dialog opens with two fields, whose grey placeholder text is only an example: nothing is pre-filled.

3. Name the repository and confirm
Fill in the Name field. The Description (optional) field is optional, and it is the only place where you will be able to fill it in. The Create button stays inactive as long as the name is empty.
What happens automatically
On creation, the server does three things without asking you:
- it creates the matching storage folder, whose name is derived from yours: any character that is neither a letter nor a digit becomes a dash;
- it installs the default validation rules. They are all disabled: no check will run until an administrator has enabled them;
- it writes an entry in the audit log.
On the other hand, no permission is set. A new repository is
visible only to the admin and lead roles: until you
have granted any permission on it, the other accounts do not see it at all, not
even in read. That is the first thing to do next, in the
Permissions tab.
Common pitfalls
"Invalid repository name"
The name is empty, or exceeds 255 characters. There is no other constraint: spaces and accents are accepted, only the storage folder name is simplified.
"Repository name already exists"
The name is unique across the whole server. The check happens on save, so the message comes after clicking Create, not while typing. Remember disabled repositories too: they still occupy their name.
I created the repository and I cannot find my files
This is the expected behaviour: creating from administration builds an empty repository on the server and never touches your disk. You probably meant to put a project you already have under uVersion.
An empty repository bothers nobody and consumes nothing: do not delete it out of reflex. Two ways out, in order of preference:
- Use it. Clone it into an empty folder, move your project's content into it, then resume at the upload step of Upload an existing project. Nothing is destroyed and the repository keeps the name you gave it.
- Leave it aside and start over from Upload an existing project, which creates its own repository from your folder, without relocating anything. You will need a different name, since this one is already taken.
My team does not see the new repository
Normal as long as no permission has been granted. See Permissions.