uVersion
English
Download →

Wiki

Desktop client

The uVersion desktop client for Windows, macOS and Linux: installation, workspace, tabs, settings.

Installation

The desktop client is a native application available for Windows, macOS (Apple Silicon) and Linux. The Windows, macOS and Linux installers also bundle the uversion CLI and make it accessible. Download it from /downloads.

Windows

Download uVersion_x.y.z_x64-setup.exe (signed NSIS installer, ~25 MB). When launched, the installer:

  • Installs the client into %LOCALAPPDATA%\uVersion (per-user, no admin required)
  • Adds the install folder to the user PATH (the uversion.exe CLI is bundled there)
  • Creates a Start menu shortcut
  • Enables auto-update via the Tauri updater

Windows fleets: the MSI

To deploy across many machines with a fleet management tool (Intune, SCCM, Group Policy...), use the MSI rather than the NSIS installer: uVersion_latest_x64_en-US.msi (stable URL, always the latest version, ~10 MB). Silent, per-machine install:

msiexec /i uVersion_latest_x64_en-US.msi /qn /norestart
  • Installs into C:\Program Files\uVersion (administrator rights required). The uversion.exe CLI is included, but the folder is not added to the PATH: if your users need it in a terminal, have your deployment tool add it.
  • No auto-update on an MSI install: the client stays at the deployed version and fleet updates happen by redeploying the next MSI. This is deliberate: the built-in updater would install a second, per-user copy next to the managed one.
  • Silent uninstall: msiexec /x uVersion_latest_x64_en-US.msi /qn

On first launch, each user enters the server address and validates the certificate fingerprint, once per user per machine (see TLS fingerprint).

macOS (Apple Silicon)

Download uVersion_x.y.z_macos-arm64.app.zip (~32 MB, Developer ID signed and Apple-notarized). Double-click to unzip, then drag uVersion.app into /Applications. On first launch, Gatekeeper automatically validates the notarization, with no warning.

The uversion CLI is bundled inside the app. On first launch, the client automatically creates a symbolic link to ~/.local/bin/uversion and adds ~/.local/bin to your PATH via ~/.zprofile: no manual action required. Open a new terminal and uversion is available.

Note: only Apple Silicon (M1/M2/M3/M4) is supported. No Intel binary.

Linux

A single format for x86_64: the AppImage (uVersion_x.y.z_amd64.AppImage, ~85 MB). Portable, it bundles its dependencies (libwebkit2gtk, libgtk, libsoup, etc.) and runs on any recent distribution with no system installation. Requirements: Ubuntu 24.04 or later, Debian 13 or later, or a distribution of an equivalent generation. The binary needs a recent system C library, and the AppImage does not lower that floor: it bundles the graphical environment, not the C library.

The recommended route is the install script. Without sudo:

curl -fSL https://uversion.io/downloads/client/install.sh | sh

It does nothing magical, and above all nothing that requires privileges:

  • it refuses to run as root, on an architecture that is not x86_64, or on a system too old to run the binary, telling you which of the three is the problem;
  • it downloads the AppImage into ~/Applications/uVersion.AppImage, checks that what arrived really is a Linux executable (otherwise a captive portal or an error page would be saved then made executable, only to fail later in some baffling way), then puts it in place in a single move, which stays safe even if a copy is already running;
  • it launches the application. That startup is what creates the entry in the applications menu, so it is best to let it happen. In a remote session with no graphical interface, it prints instead the exact command to type from your own desktop.
Nothing to install, FUSE included The script installs nothing on the system. The AppImage runtime is statically linked, so libfuse2 is of no use to it: it only needs the kernel's FUSE, present out of the box on the supported versions. And when that is missing, the application extracts itself at startup instead of mounting, without asking for anything. So the absence of FUSE changes the startup mode, it never has to become an administrator request. The chosen mode is remembered in the menu entry, you do not have to remember it.

You can also download the AppImage by hand from the download page, make it executable and run it:

chmod +x uVersion_x.y.z_amd64.AppImage
./uVersion_x.y.z_amd64.AppImage

There is no .deb package for the client, and there will not be one: a package installed by dpkg can only update itself by going back through dpkg, hence a privilege elevation on every version, which is impossible for a machine without administrator rights. The AppImage replaces itself, with no password. The server, on the other hand, does keep its .deb package.

Note: the uversion CLI is bundled inside the AppImage. On first launch, the client copies the binary to ~/.local/bin/uversion and adds ~/.local/bin to your PATH via ~/.profile (no manual action required). The entry in the applications menu is created on first launch, for the same reason: an AppImage is a file, not an installation.

First launch

1. Enter the server address and your credentials

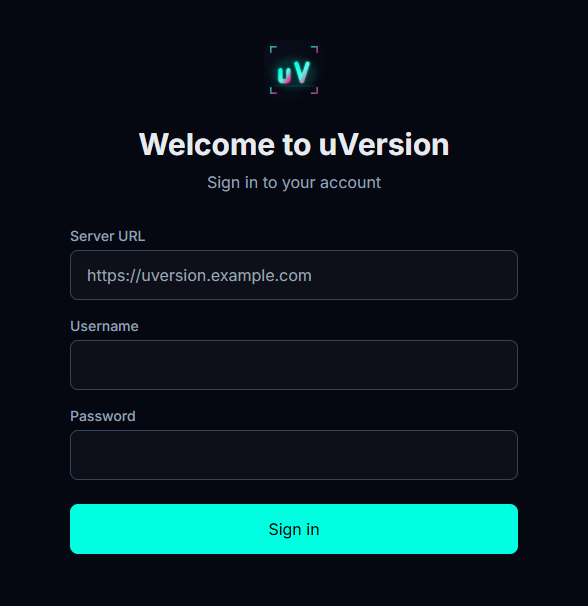
On first launch, the client shows the login page, titled Welcome to uVersion. The Server address field does not expect a full URL: it is split into three blocks, a non-editable https:// prefix, the host, and the port (8443 by default). The scheme is imposed, the client cannot produce a http://. Pasting a full address or a host:port into the host box splits it automatically across the two fields. Then fill in Username and Password, and click Sign in.

The desktop client login page: the Server address field in three blocks (greyed https:// prefix, host, port 8443), the Username and Password fields, and the Sign in button.

2. Verify the server fingerprint, once

Since a uVersion server is self-signed by default, the very first connection to a given machine shows Verify server identity: compare the SHA-256 fingerprint with the one your administrator gave you, then click Trust this server. The question is asked only once per server, and if it comes back under the red heading Server identity changed, the fingerprint has changed: do not accept without checking. See TLS fingerprint.

The Verify server identity dialog: the server's SHA-256 fingerprint and the Trust this server button.

Once connected, the client remembers your session securely. The uversion CLI and the editor plugins (Unreal, Rider) automatically reuse the same credentials: you do not re-enter your password anywhere else.

Open or clone a repository

Signing in opens no project: the repository list is requested explicitly. It is the same window that serves to clone a project for the first time and to reopen a workspace already present on disk.

1. Open the Open Repository window

As long as no tab is open, the Workspace shows No repository selected and an Open Repository button. Once you have at least one tab, the same screen is reached from the + of the tab bar. The window lists, one card per project, the repositories you have access to, with a Refresh button to ask the server for the list again.

The Open Repository window: one card per project with its name, description and creation date, the Workspace name field under each card, the green Clone button, and at the bottom the Download files after clone checkbox.

2. Clone, or reopen an existing workspace

Each card offers the action matching its state:

  • Clone: creates a fresh workspace. The card's Workspace name field names the folder created, and falls back to the project name if left empty. The folder picker that follows asks for the parent folder: uVersion creates the subfolder itself.
  • Clone New: the same button, renamed when a workspace already exists for this project. Cloning a second time is legitimate, for example to keep two states of the project side by side.
  • Open: reopens a workspace already cloned on this machine, whose path is recalled under the card. Switch to Open Tab appears instead when the tab is already open.
  • Open Local Repository..., at the bottom of the window: points to a folder that already contains a .uversion/, for example after moving a workspace.

The Download files after clone checkbox, at the bottom, is ticked by default and starts the download right after the clone. Untick it to create the workspace now and fetch the files later.

3. Follow the download

The window closes as soon as the clone starts, and that is deliberate: the transfer can last for hours and must not block you. Progress continues in the client header, the workspace tab opens by itself at the end, and a network drop loses nothing since the transfer resumes on its own.

Workspace

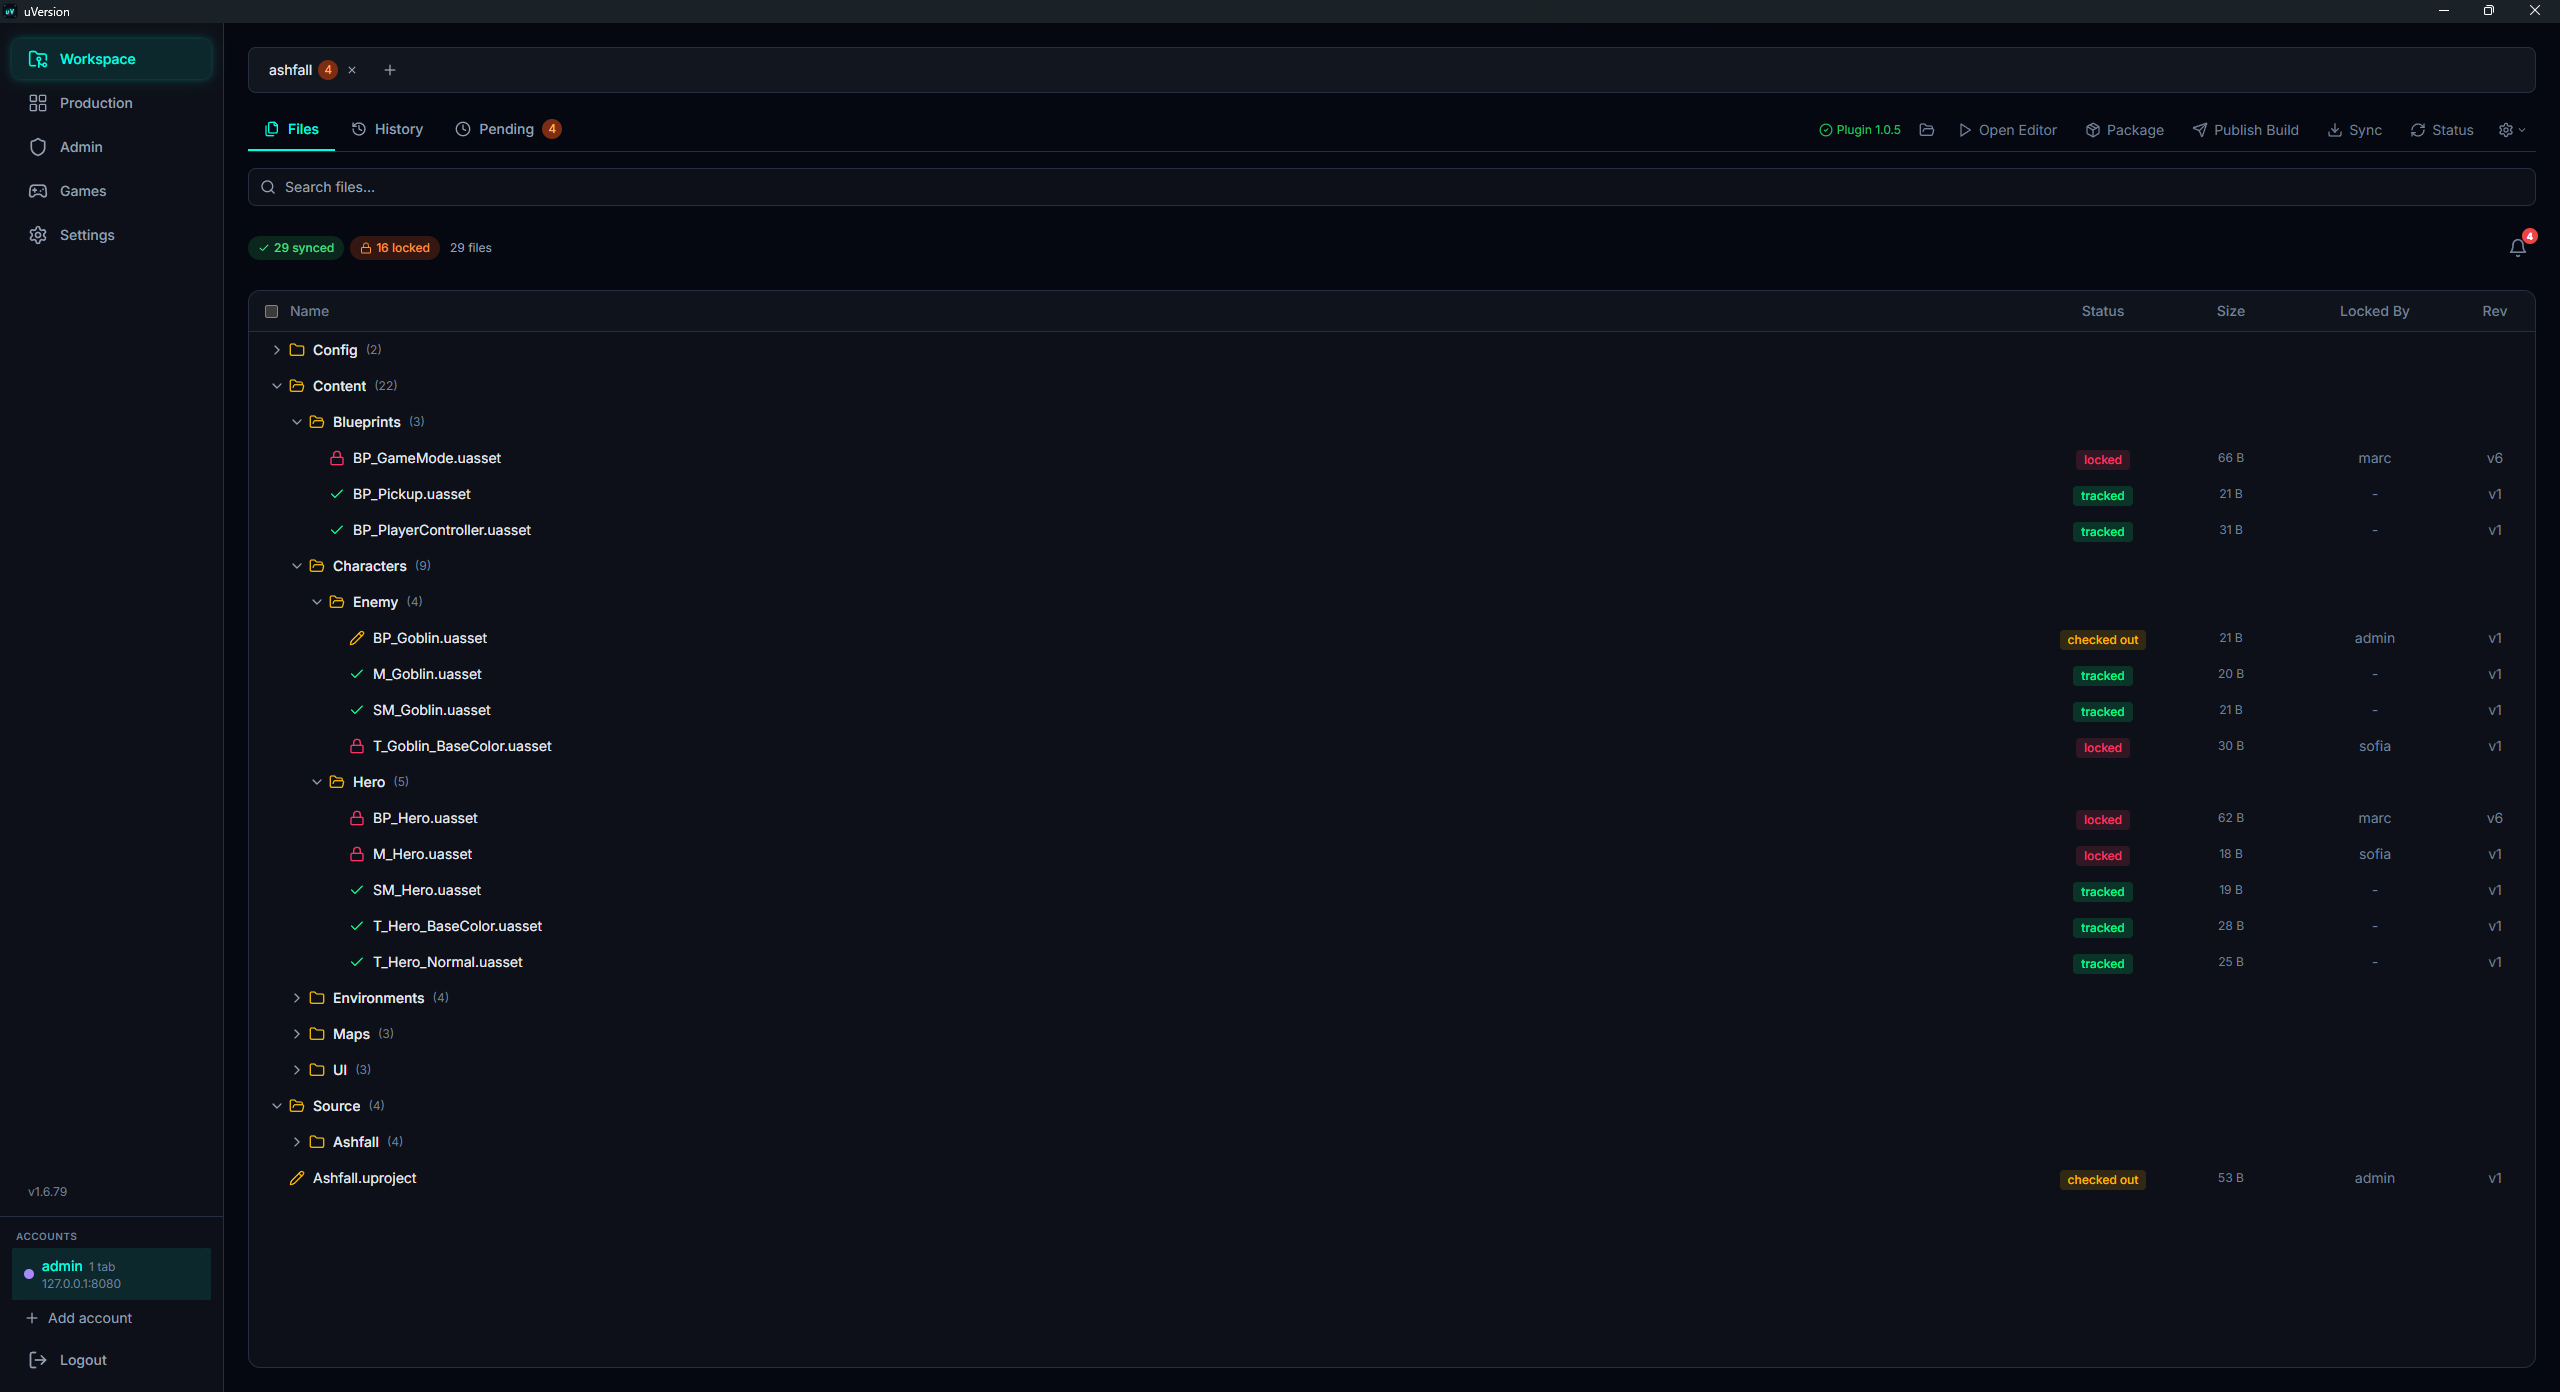
Workspace tab bar at the top, with several workspaces open at once.

A workspace is a local folder linked to a server repository. The client can manage several workspaces at once, shown in the tab bar at the top. Each workspace stores its metadata in .uversion/ at the root of the local folder:

  • .uversion/config.toml: the only truly important file. Its [workspace] section carries the workspace owner (owner), its id, its name, and last_synced_revision, the revision you are synced to (there is no .last_sync file). It is also where the Unreal engine path is remembered.
  • .uversion/checkouts_<workspace_id>.json: the locks that YOU hold in this workspace
  • .uversion/changelists_<workspace_id>.json: your changelists, that is, bundles of checked-out files you group to submit them separately. Purely local, never sent to the server.
  • .uversion/pending_deletes_<workspace_id>.json: deletions awaiting submission
  • .uversion/snapshots.json: the known state of the files, used to spot what you have changed locally
Do not version .uversion/ This folder describes YOUR copy: it holds your owner identity and your locks. Copying a workspace from one machine to another carries this information along, and the client then refuses to open it under another account. Clone a copy of your own instead.

Files tab

File tree with the status chips (Synced, Modified, Local only, Locked...) and the search bar.

Tree view of the workspace files with their state. Two ways to narrow the list:

  • The search field, labeled Search files...: filters on a portion of the path, case-insensitive.
  • The status chips, just below. They are clickable counters, and a chip appears only if its counter is above zero: on a freshly synced workspace, you will therefore see only {n} synced, and the absence of the others is normal. The six possible chips are {n} synced, {n} modified, {n} local only, {n} server only, {n} locked and {n} deleted.

Search and chips combine: the search narrows first, the chips filter next. The view stays smooth even on projects with tens of thousands of files.

Multi-select + actions

The action bar exists only if something is selected. As long as the selection is empty, there is no button: that is normal, it is not a load in progress. Select files (click + shift, or the checkboxes) and the bar appears, prefixed with the number kept ({n} file(s) selected). The buttons show up according to what the selection allows:

ButtonWhat it does
HistoryOpens the history of the targeted file or folder.
AddPuts a local only file under tracking. It is the first of the two buttons of the very first submit: a file you have just created does not exist on the server side, so there is nothing to lock.
CheckoutAcquires the locks. Idempotent: re-locking a file already locked by you does nothing.
CheckinOpens the message dialog, then submits. It is the second button of the first submit, and the one for every following submit.
RevertReleases the lock and restores the server version. Your local changes are lost.
DeleteMarks the files as deleted. The deletion goes out at the next checkin.
DownloadRe-downloads the selected files from the server, useful to recover a file damaged locally.
There is no Sync button in the Files tab The button that fetches the selected files is called Download. The Sync, the one that updates the whole workspace, lives in the Workspace bar, top right, next to Status.

Pending tab

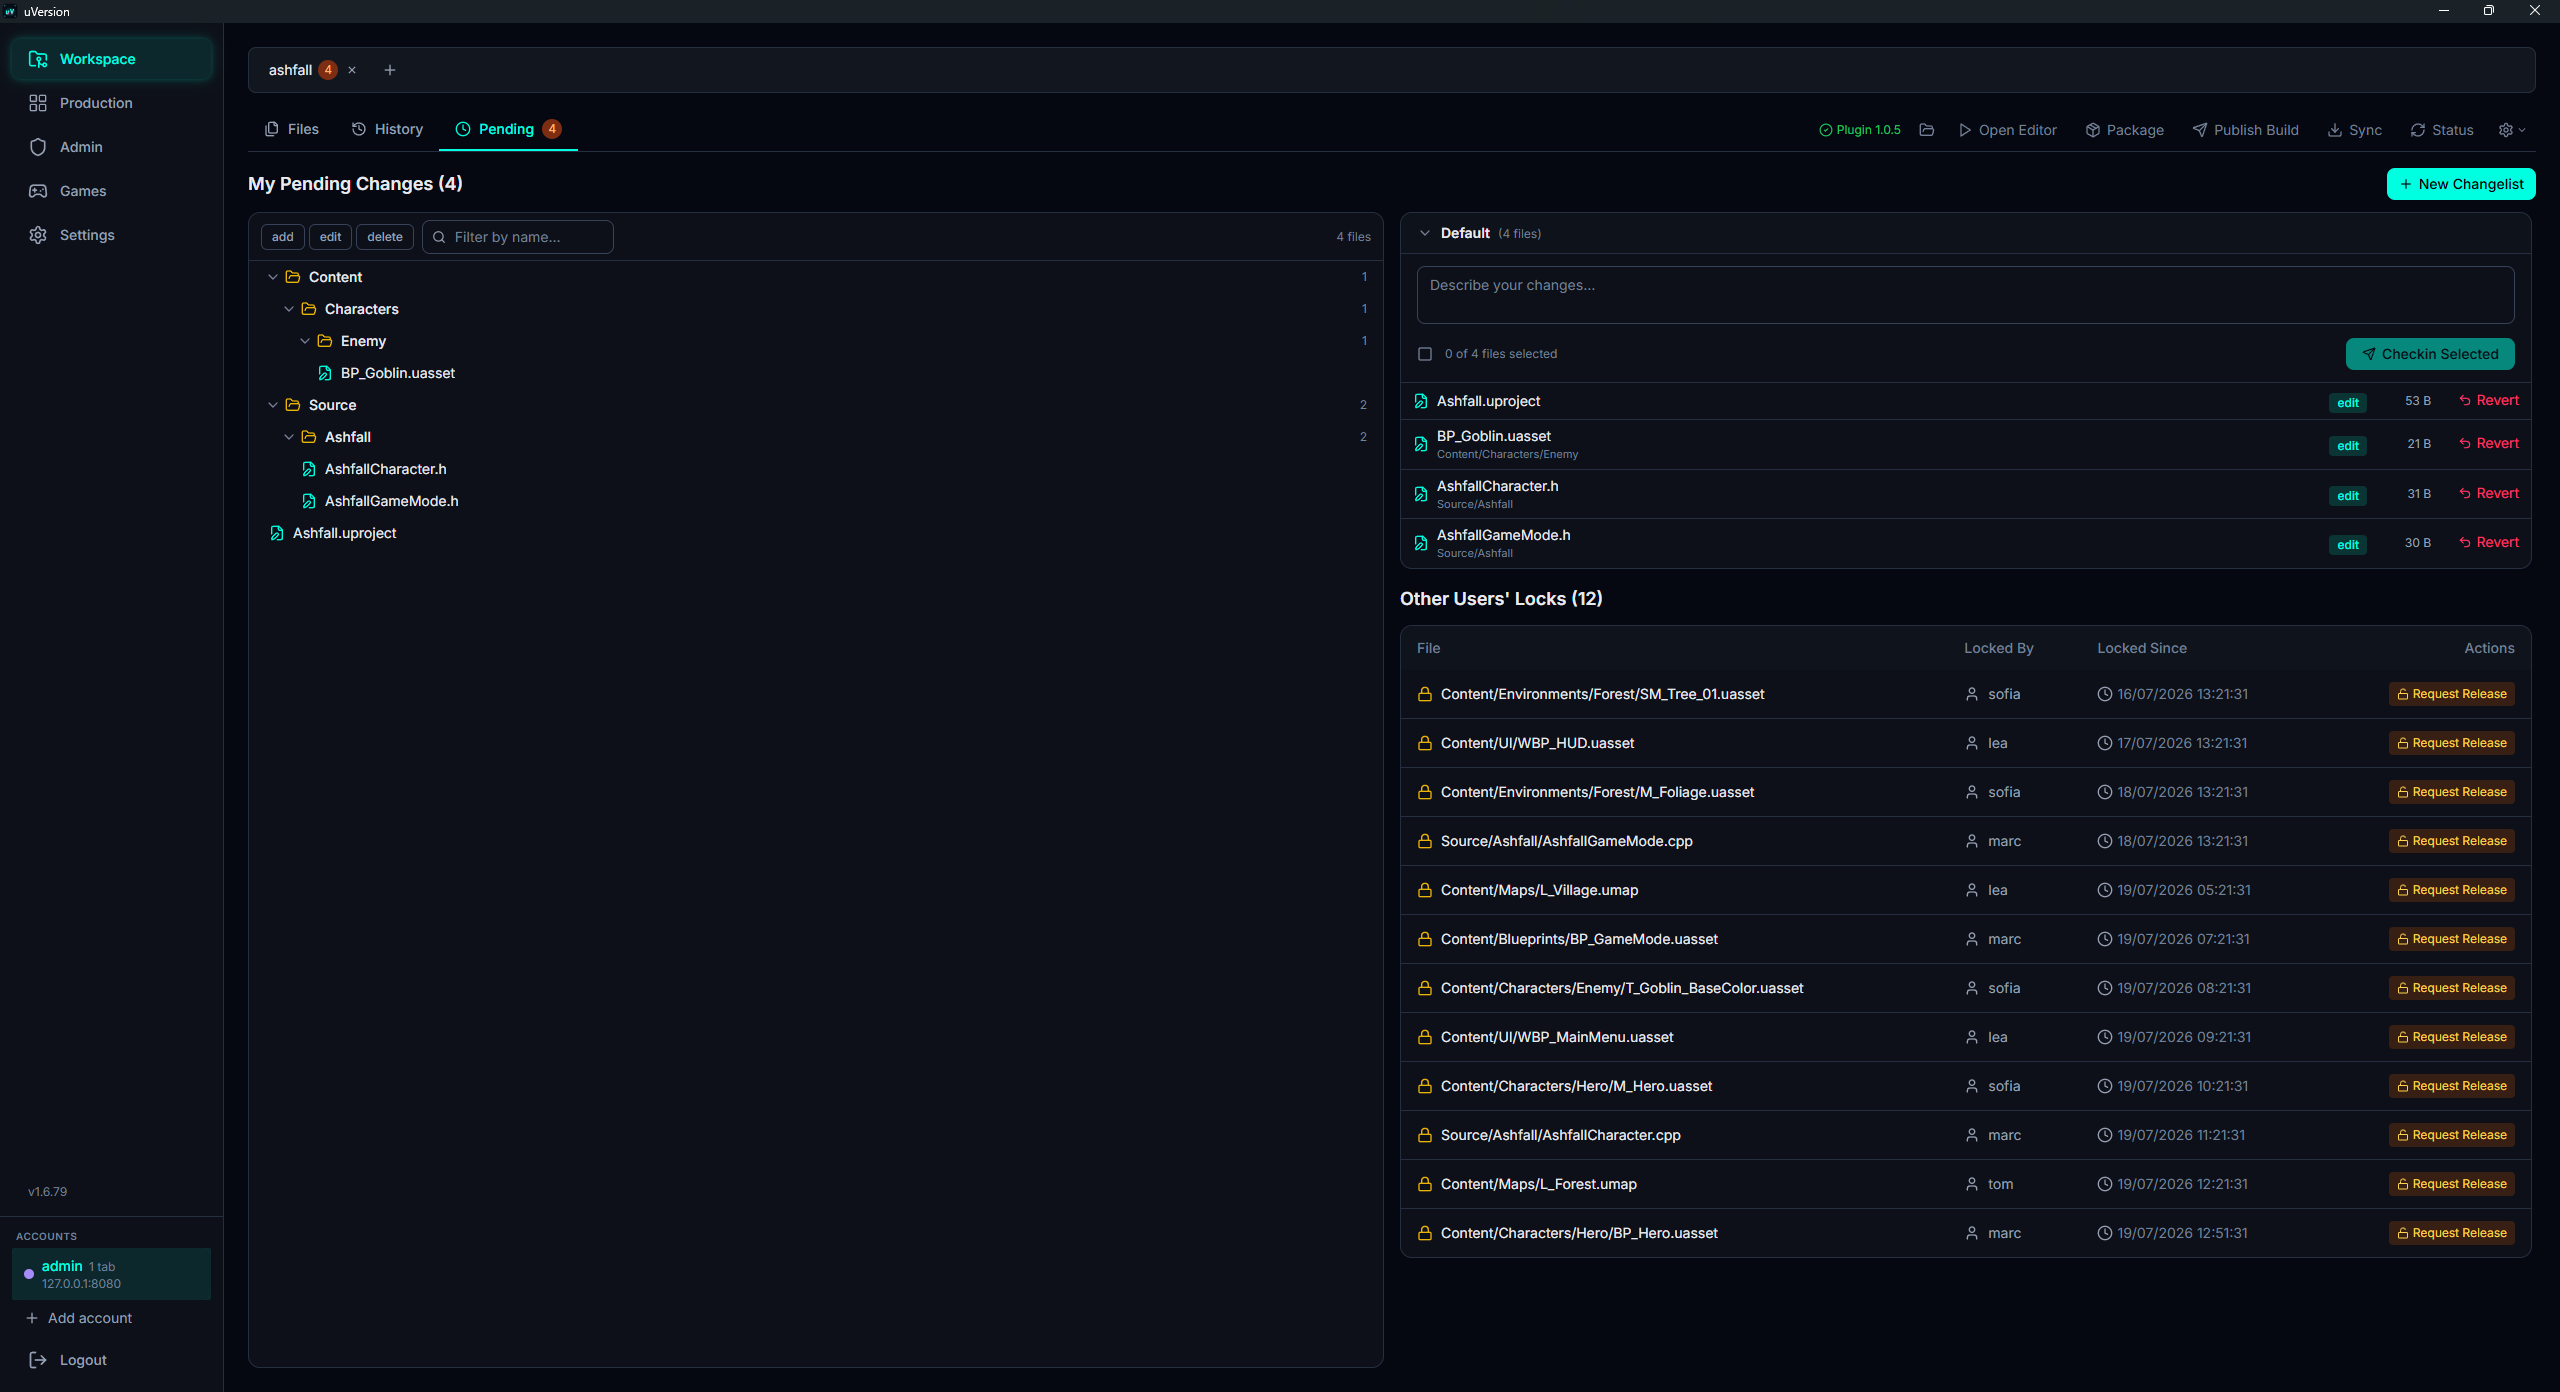
Pending tab: 'Your locks' and 'Other users' locks' sections, with the Request release and Force unlock buttons.

Files currently checked-out, locked by you OR by another user. Two sections:

  • Your locks: you can checkin, revert, or release them individually
  • Other users' locks: you see who holds the lock + a Request release button that creates a request card in the Production board (a request badge)

Admins also see a Force unlock button on other people's locks, which releases the lock without the holder's consent. Every force unlock is audited.

History tab
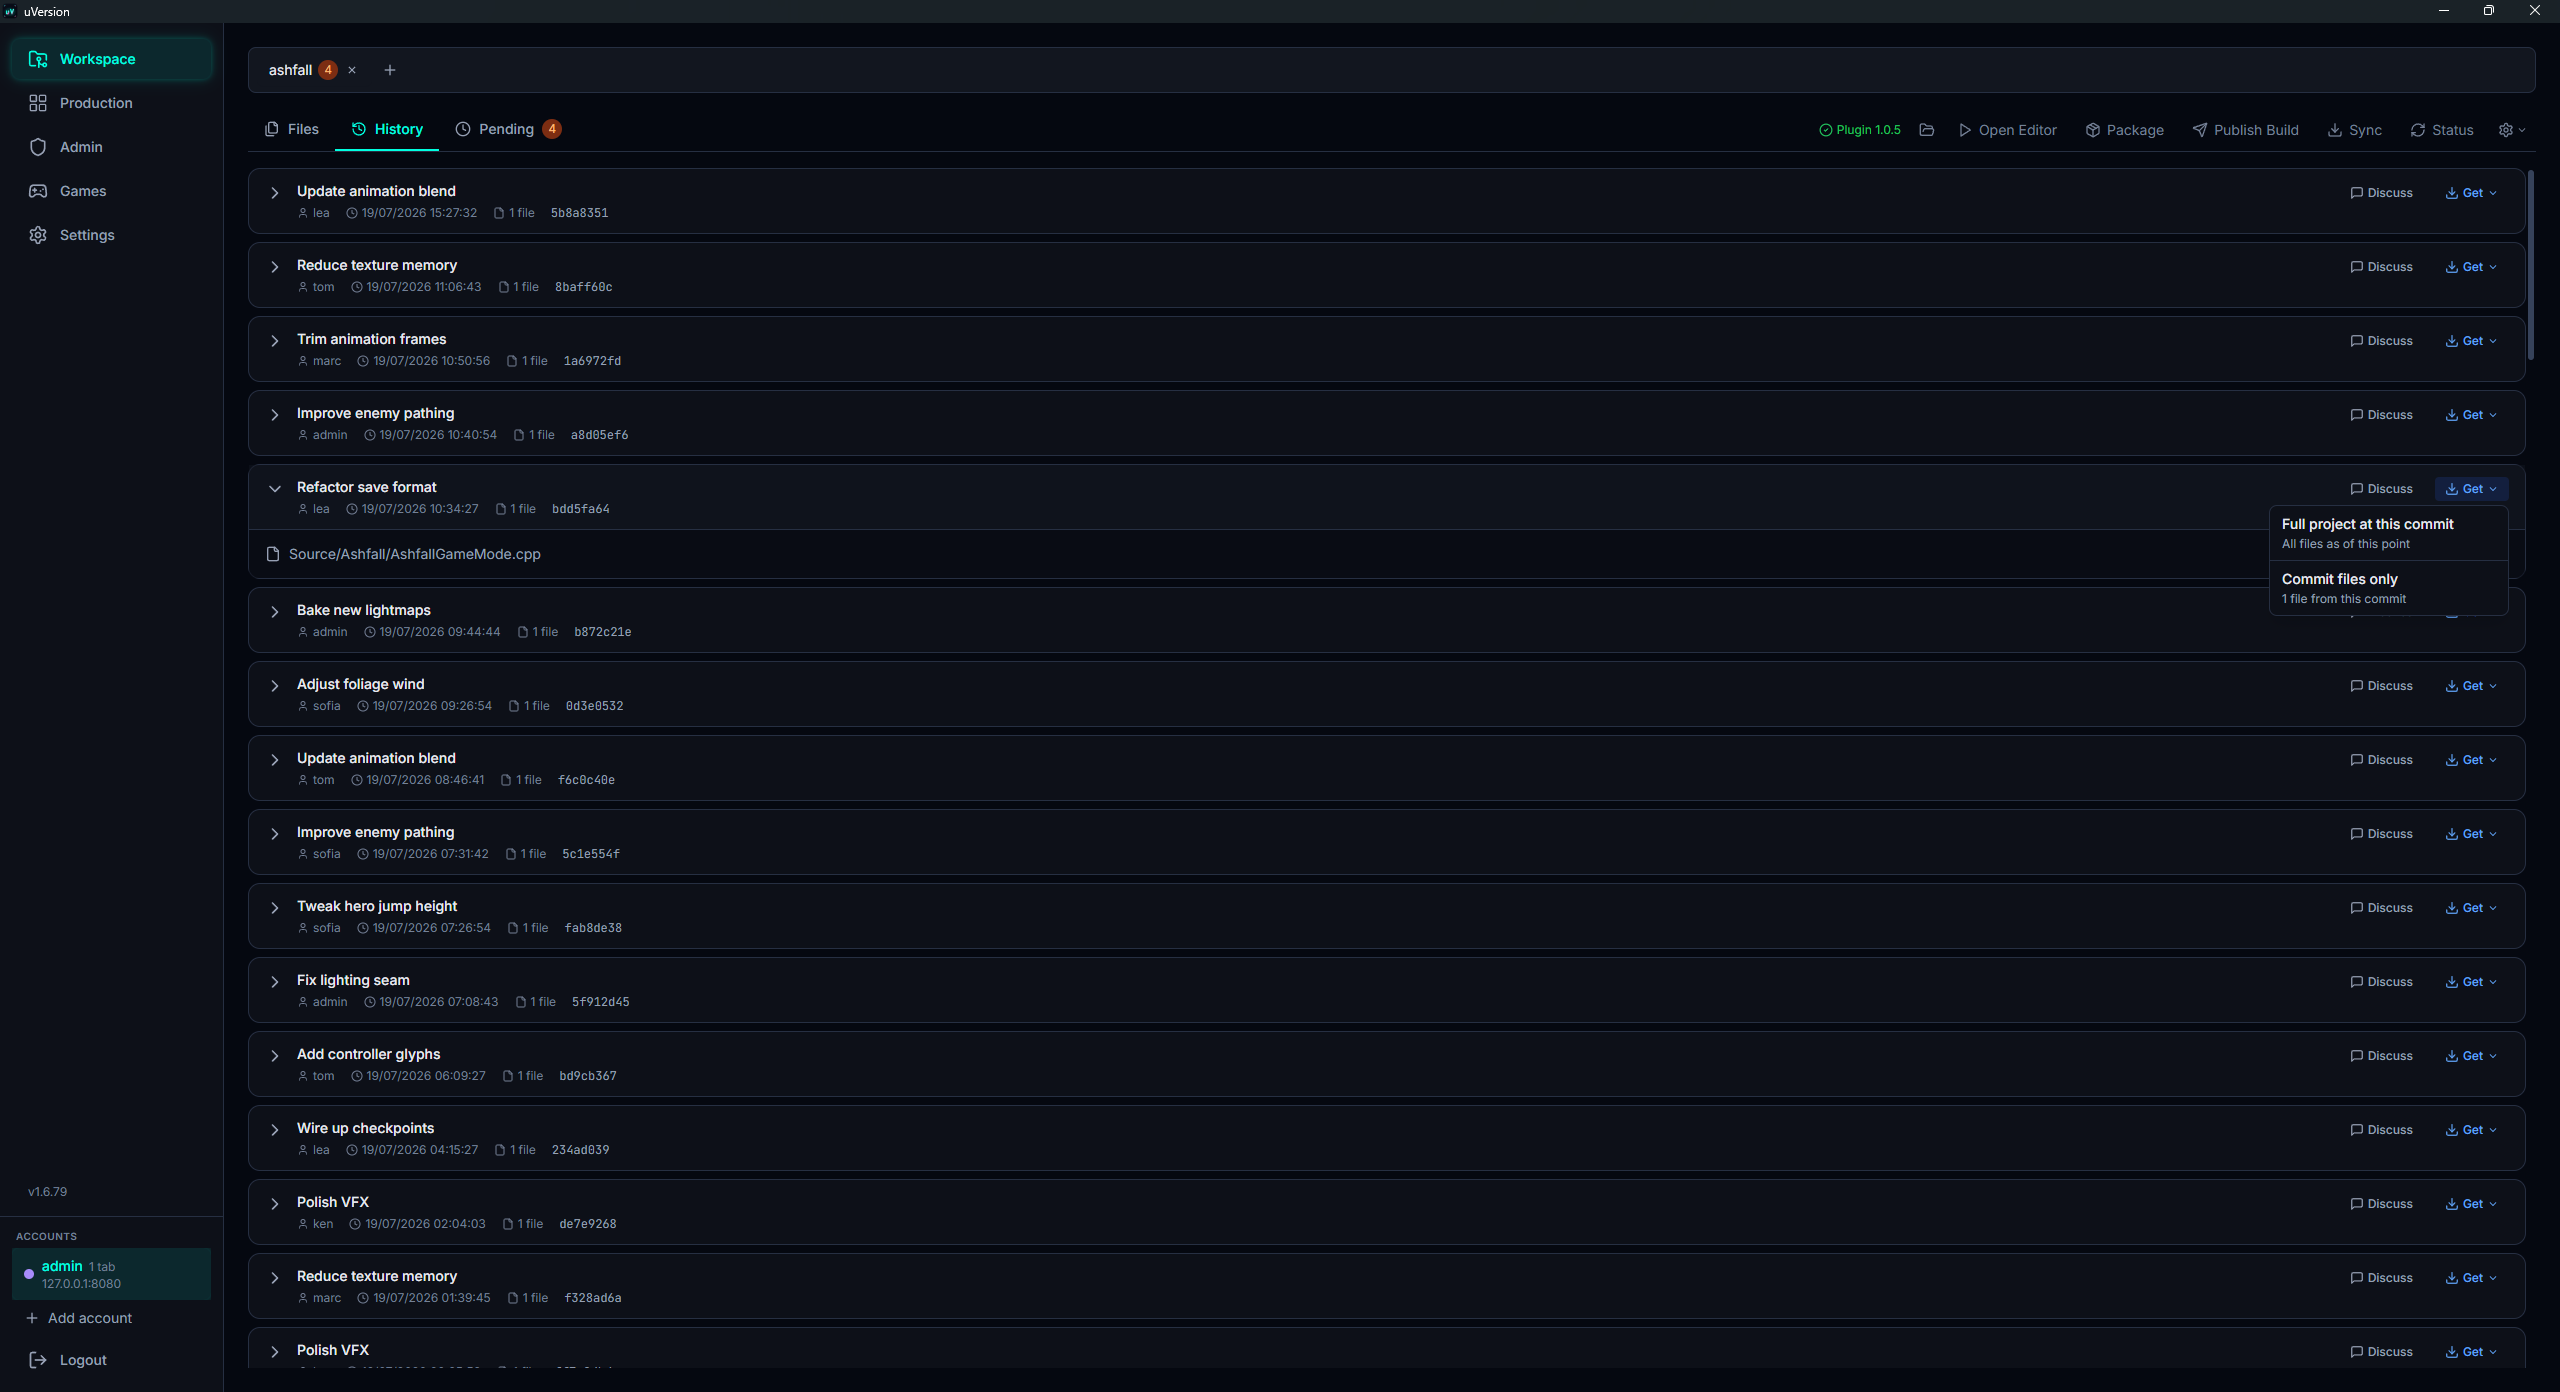
An expanded commit with its file list and the commit's 'Get all' button.

Paginated list of the repository's commits, with author, date, message, and changed files. Clicking a commit opens the detail: the full list of the commit's files with their revisions.

A Get all button on each commit downloads a local copy of every file at that revision (useful to recover a stable state).

Production

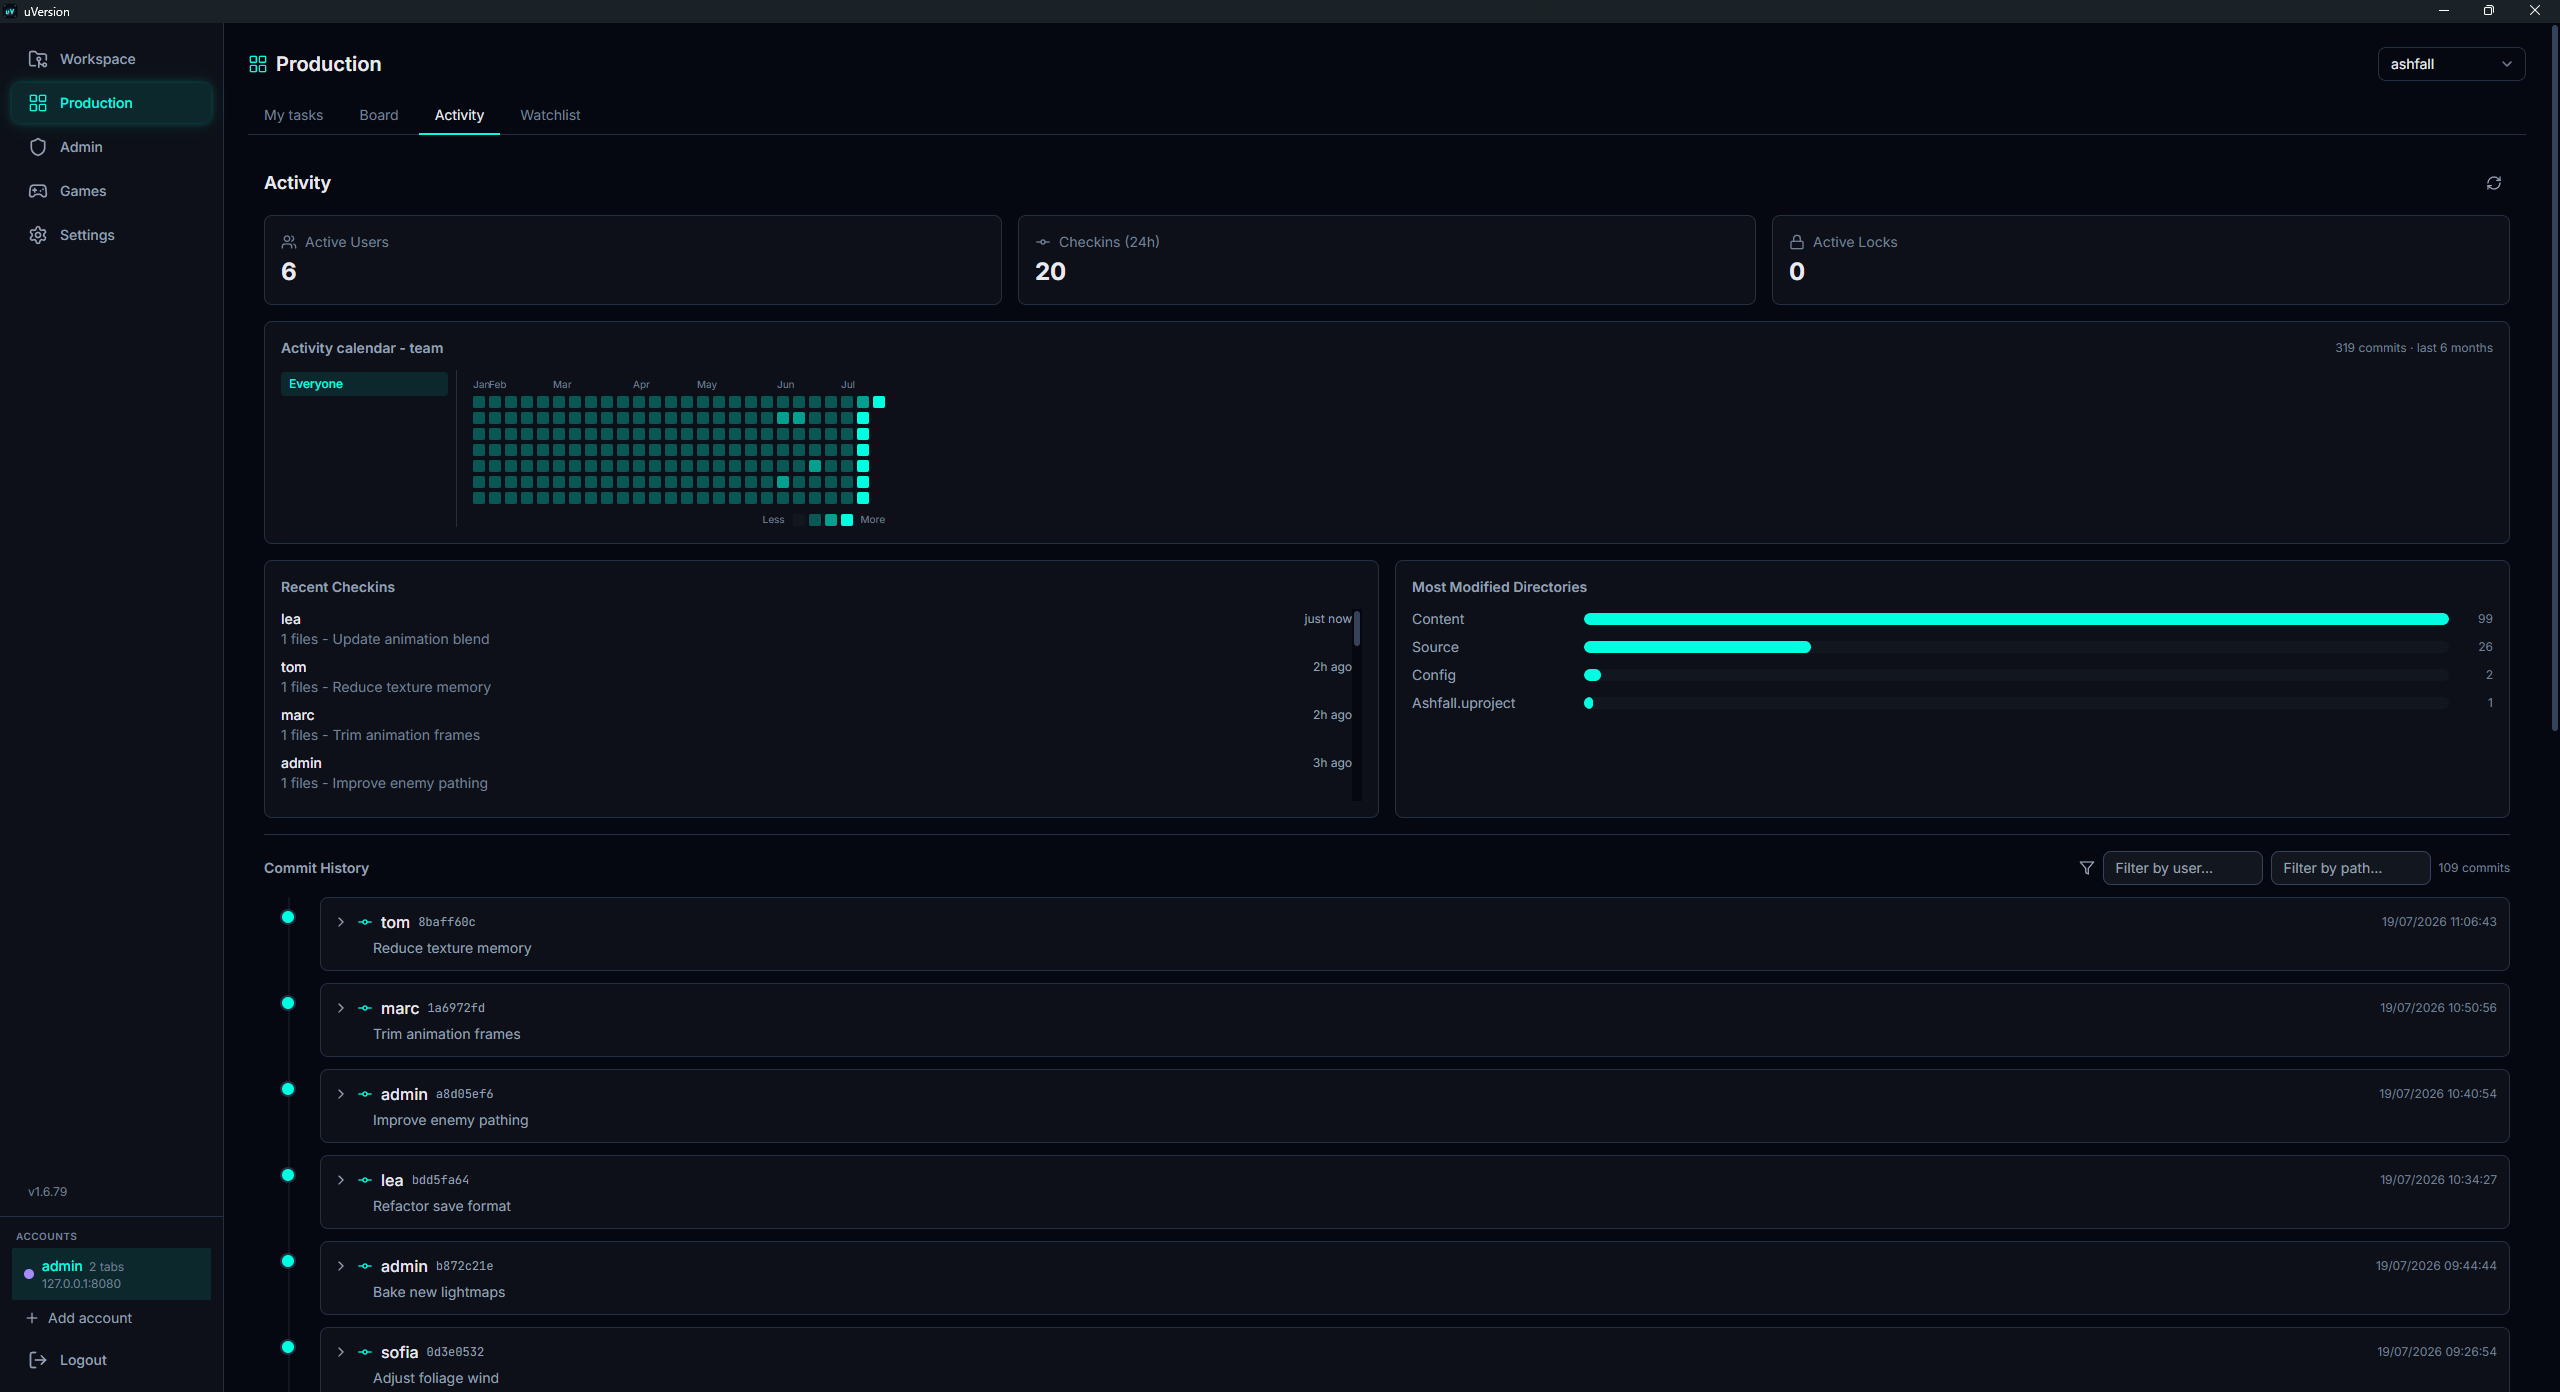
The Production area (a dedicated entry in the sidebar) gathers project tracking, per repository. The Workspace, for its part, focuses on files (Files, Pending, History).

My tasks

The tasks assigned to you, across all projects.

The list of cards assigned to you, aggregated across every repository you have access to.

Board
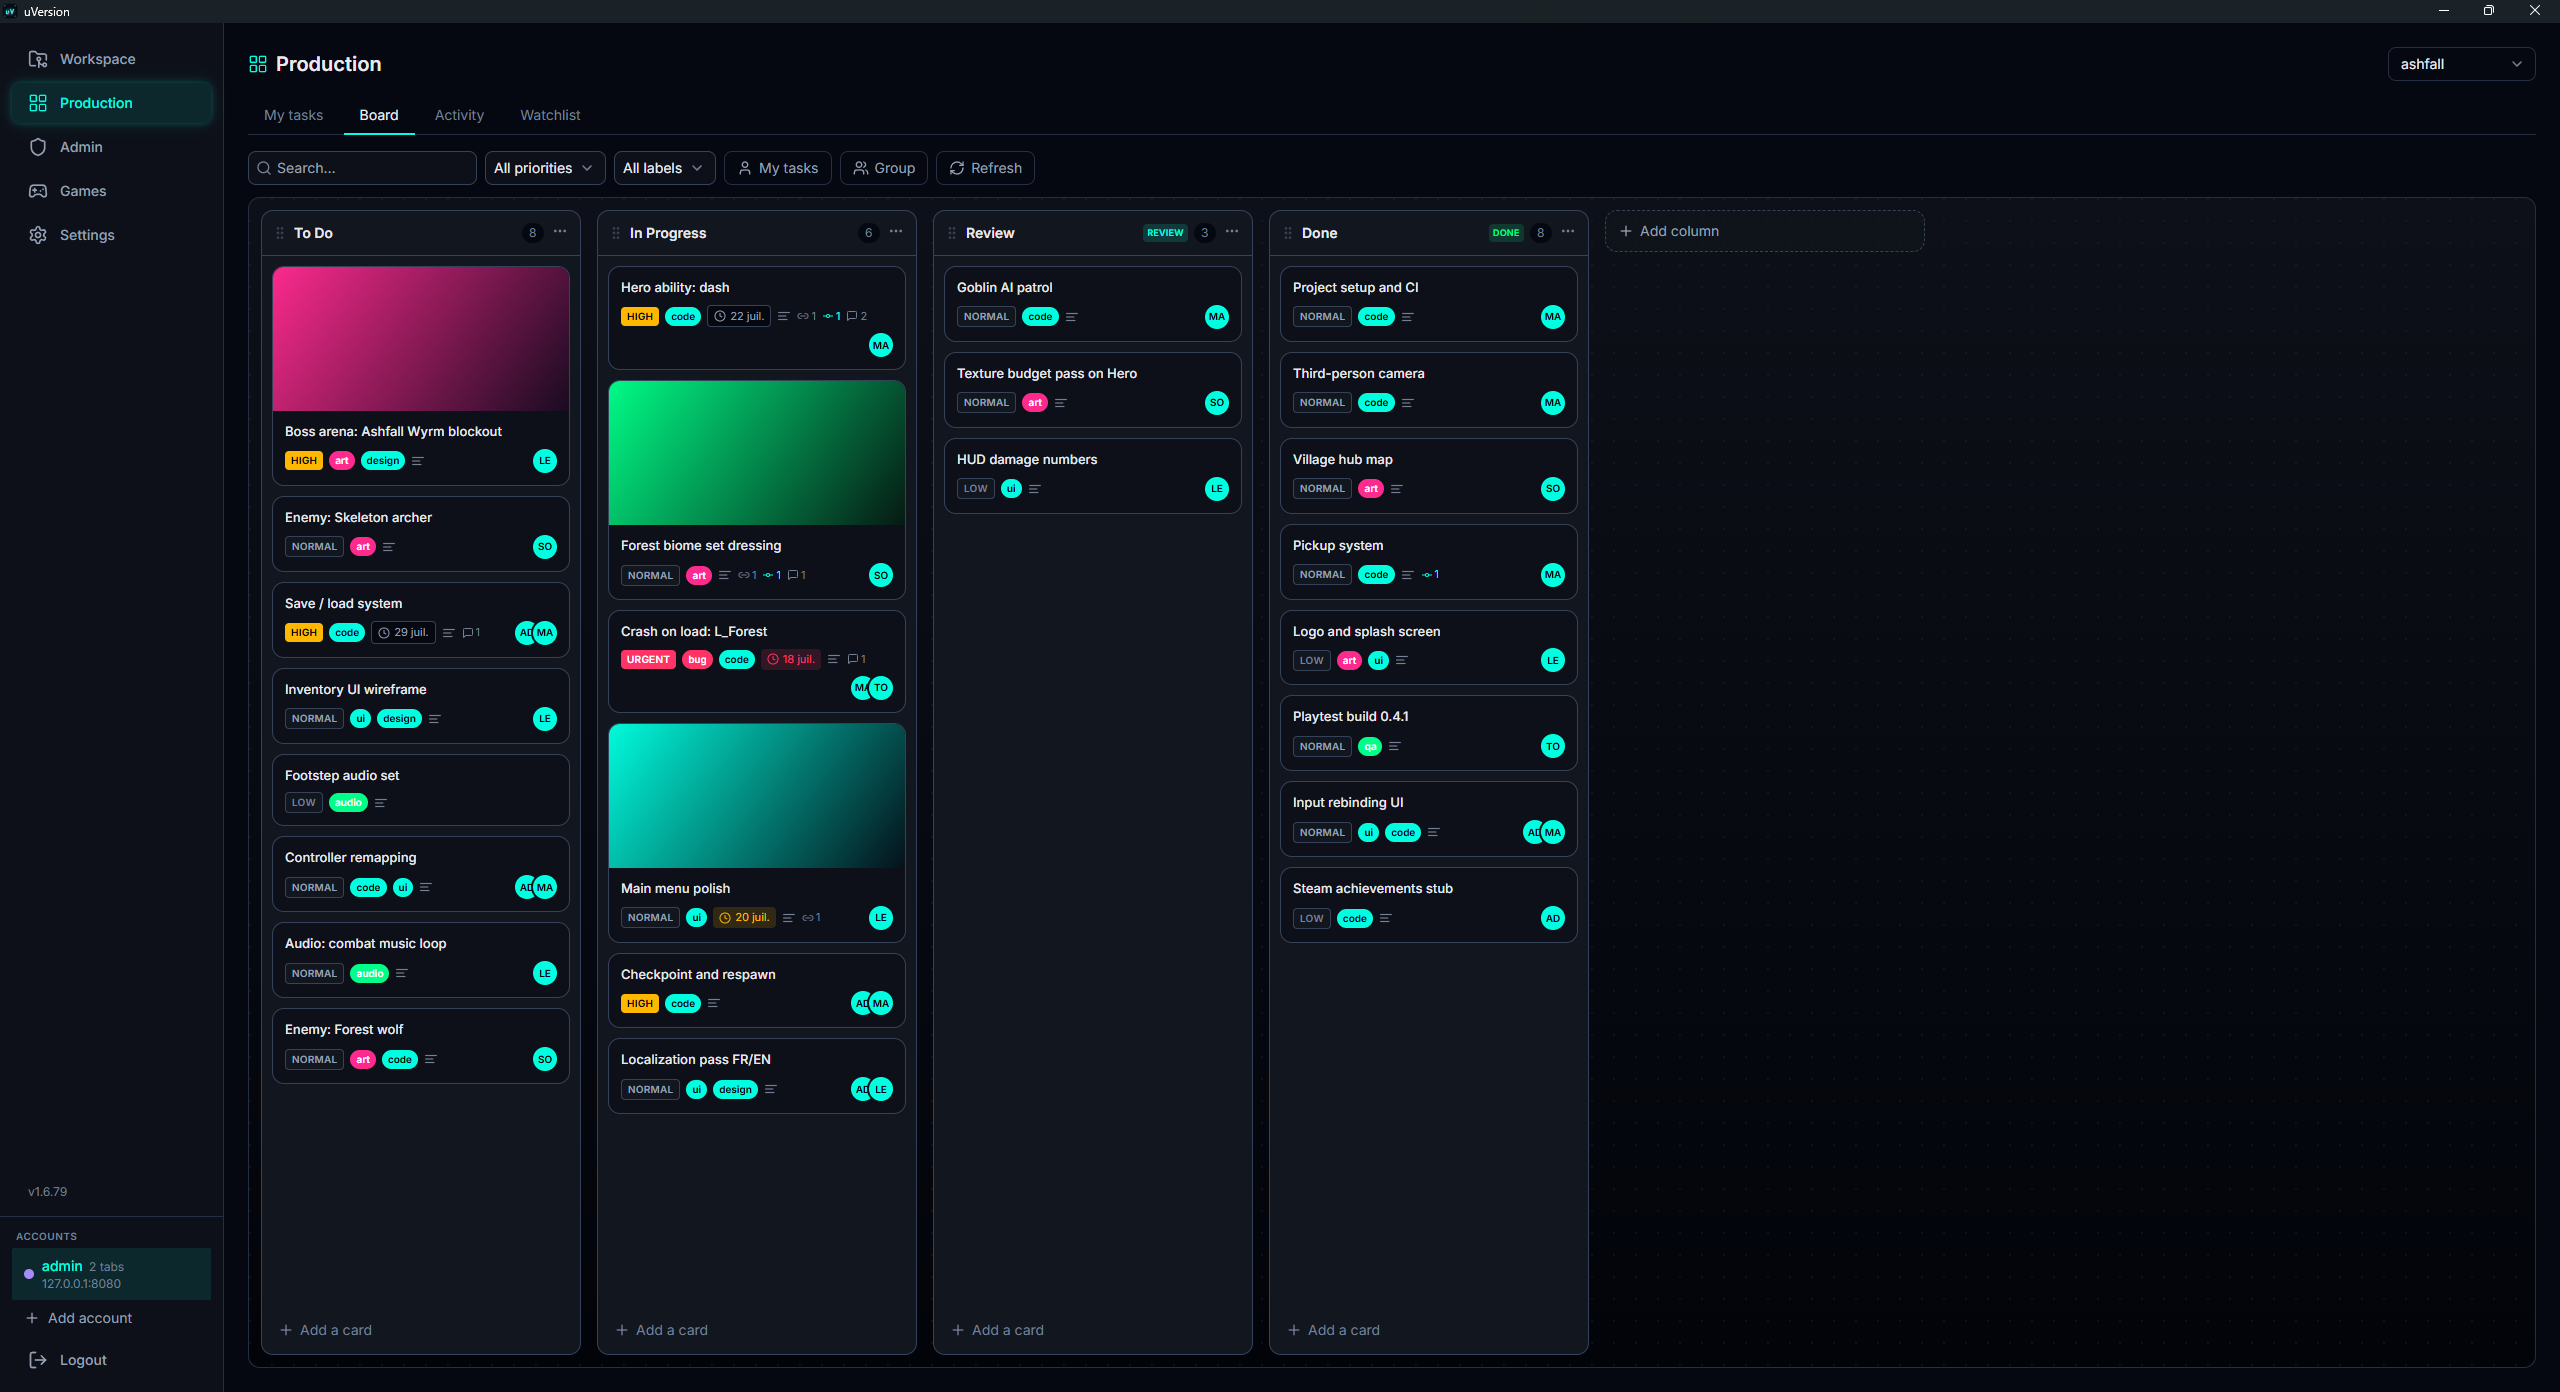
The kanban: To Do / In Progress / Review / Done columns, cards with priority, labels, assignees, covers.

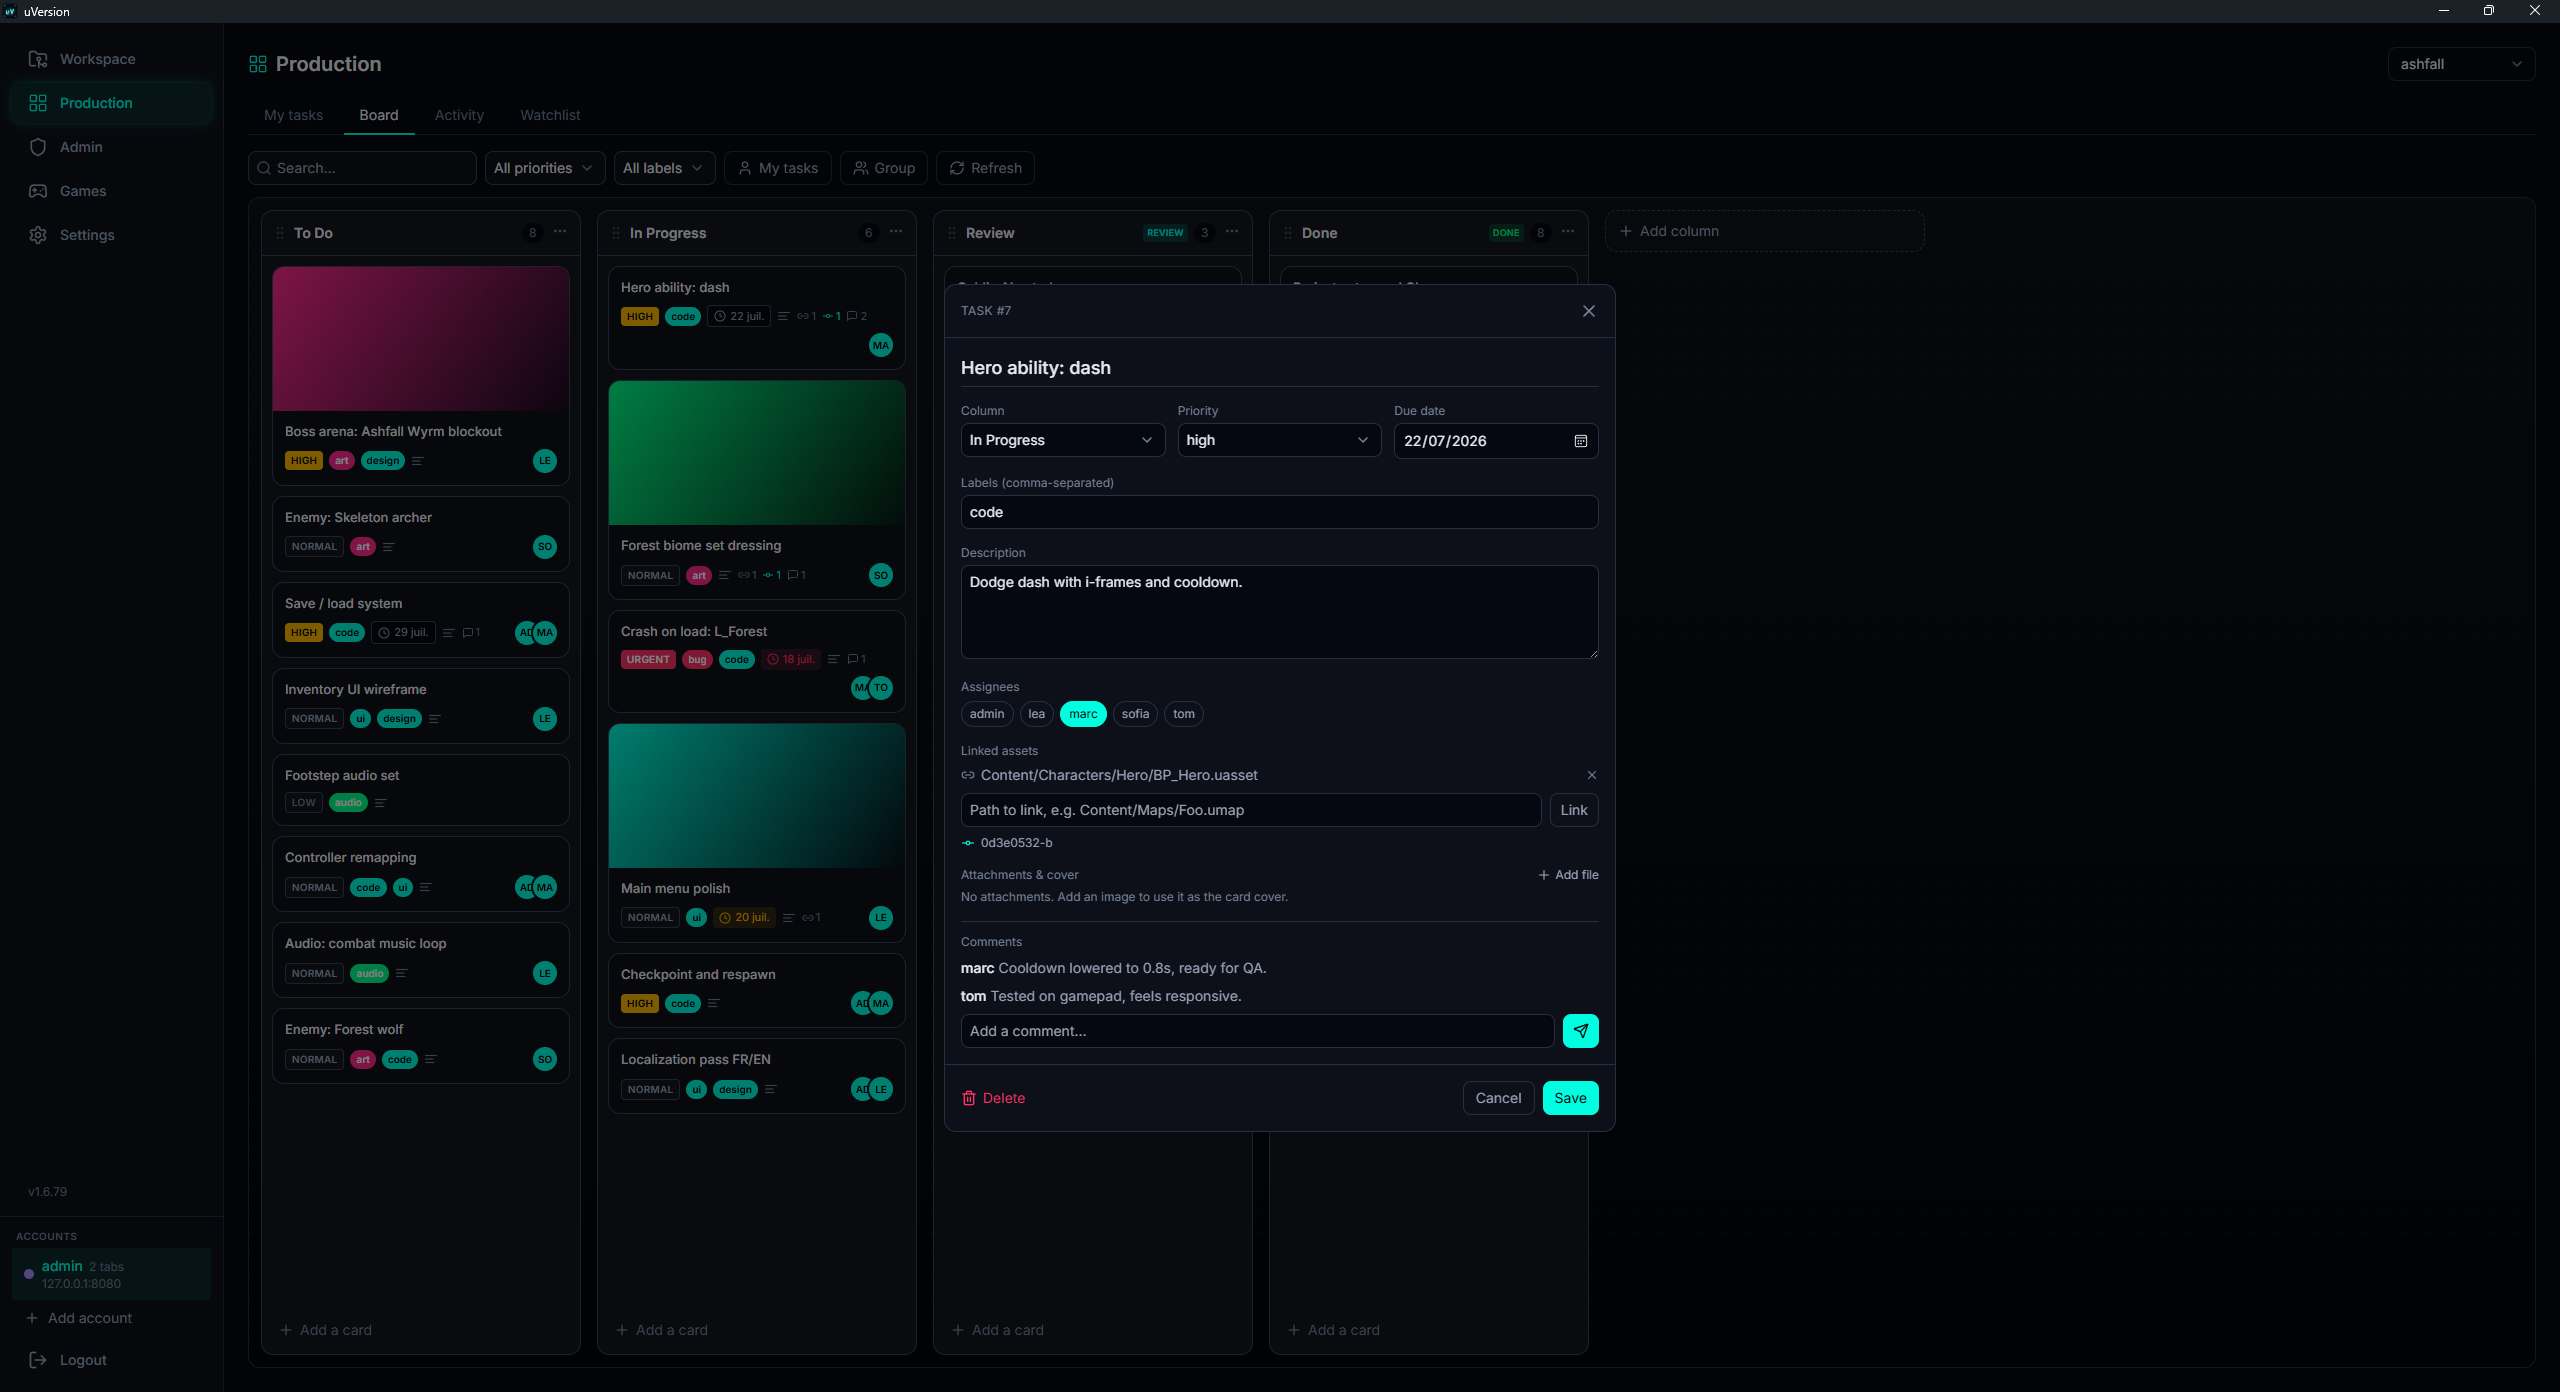
Kanban board per repository, with configurable columns (To Do, In Progress, Review, Done by default). Each card carries a priority (low / normal / high / urgent), labels, assignees, a due date, comments, links to assets or commits, and a cover image.

A second view of the board: typed cards carrying the BUG, BLOCKER, HELP and TO TEST badges, with their priorities, assignees and comment counters.
Requests are board cards A request (for example 'Request release' on a lock held by someone else, in the Pending tab) is a board card carrying a request badge.
An open card: description, assignees, due date, comments, asset/commit links, cover.

Dashboard

The top of the production Dashboard: the project health banner, the open blockers and lingering locks counters, the zones that concentrate the issues, this week's commits, the project weight and the last published build.

The producer's cockpit: a project health banner (open blockers, pending playtest reports), the zones that concentrate the issues, this week's commits, the project weight and the last published build, each block linking to the board or to Games.

The Dashboard calendar timeline: a month shown with a milestone, a recurring weekly playtest, a release and card due dates, and the Add milestone button top right.

Below it, the calendar timeline: milestones, playtests (one-off or recurring), releases and card due dates. A recurring playtest automatically generates its board card at each occurrence.

Watchlist

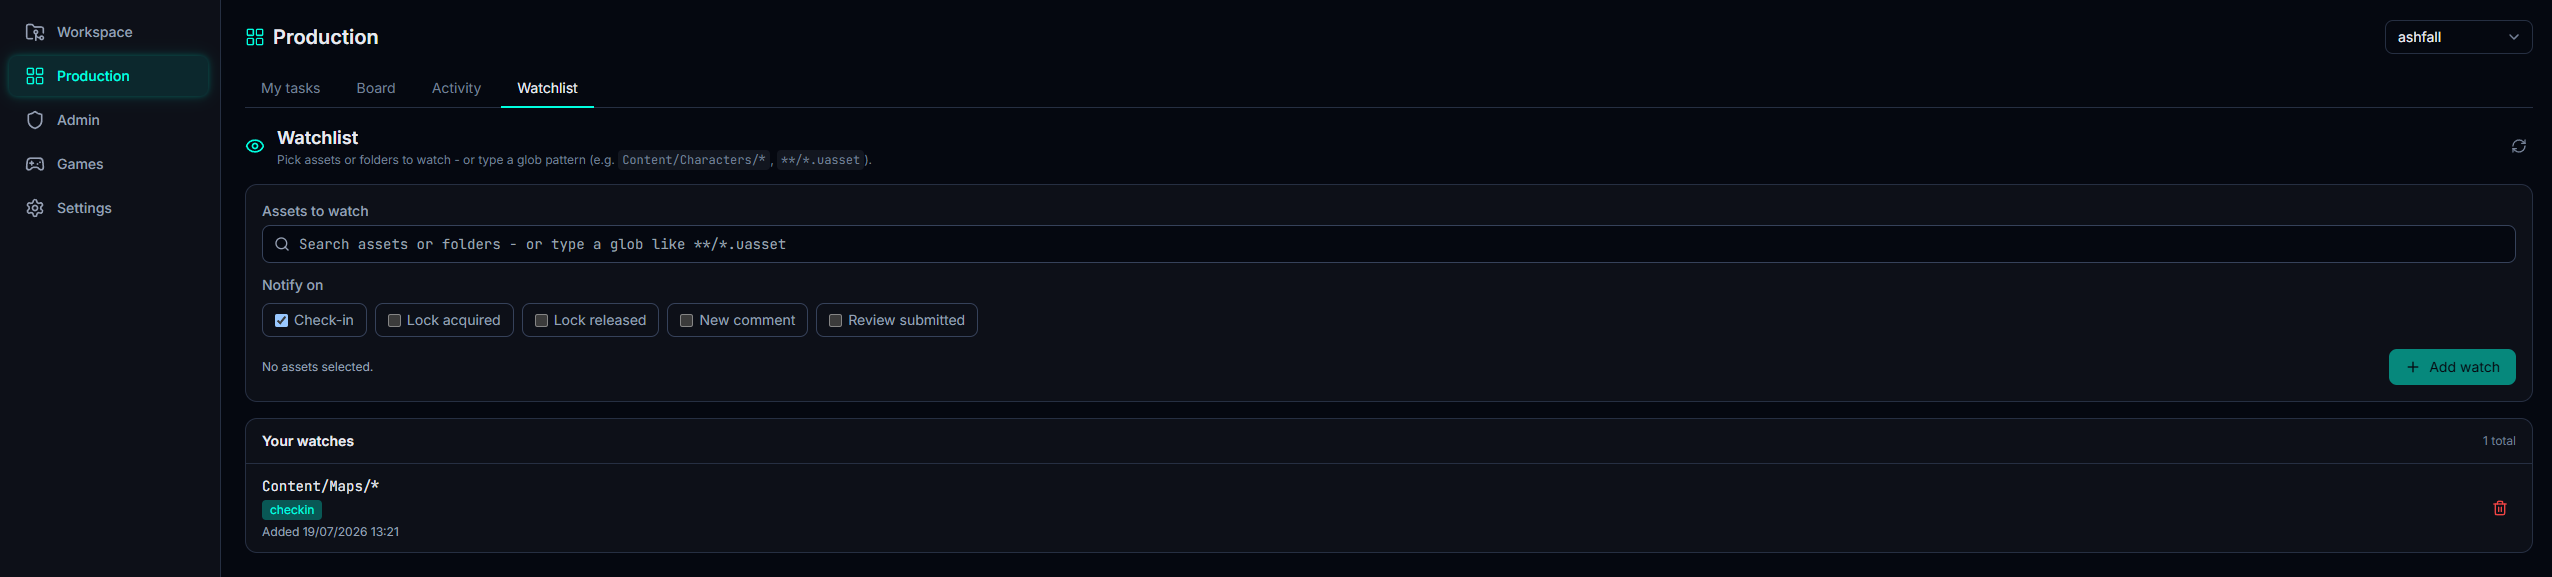
The per-path watches.

Watch paths (glob patterns) to be notified of the check-ins that touch them. Each entry states the watched path and the events being followed.

Games

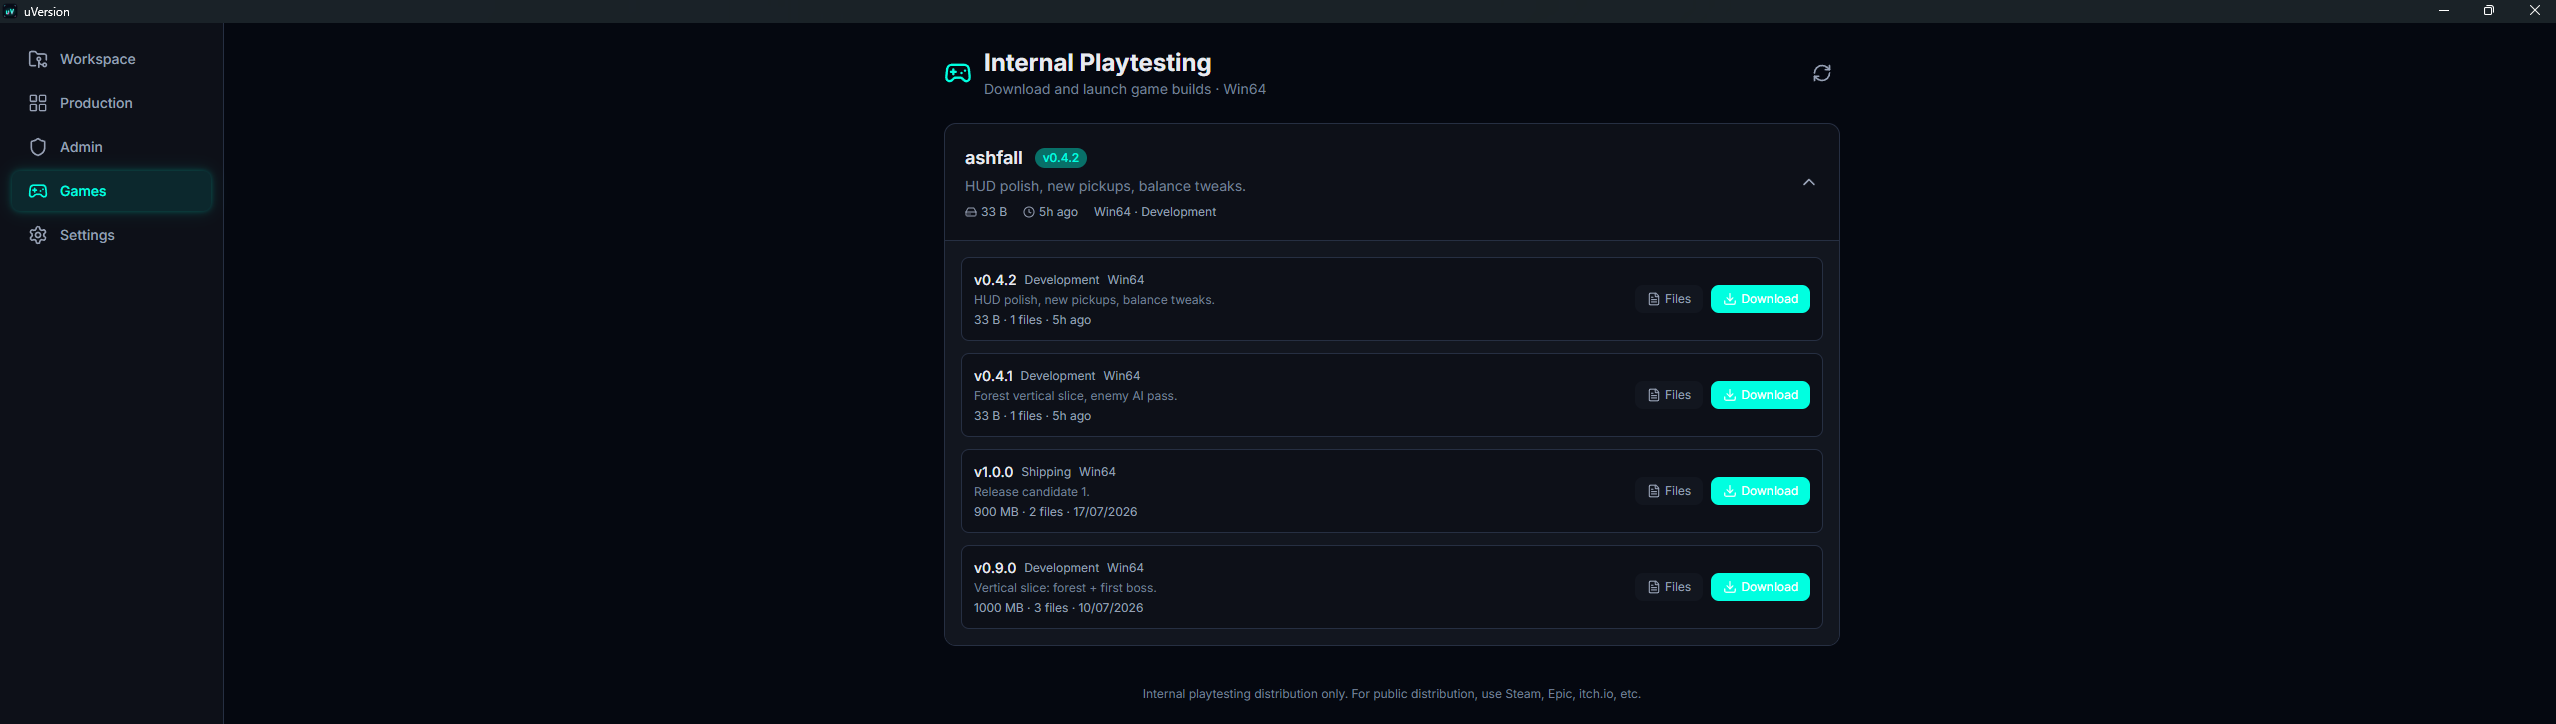
The Games page: the published playtest builds, with platform-aware download.

The Games area lists the internal playtest builds published for the project. Each build states its version, its configuration (DebugGame / Development / Shipping), its platform (Win64 / Mac / Linux), its size and its release notes, with a download button suited to the platform.

It is the access point for playtesters: an account with the playtester role sees only this page (neither Workspace nor Production), and reaches only the builds of the projects opened to it.

Local changelists

📷 Screenshot · client-changelists
Checked-out files split across two local changelists (for example 'default' and 'review').

Group your checked-out files into several independent commits. Changelists are local to your workspace (never sent to the server). Useful to:

  • Separate a critical fix from work in progress
  • Prepare several submits in parallel without mixing everything
  • Keep a "default" changelist for WIP and a "review" one for what goes to checkin

Settings

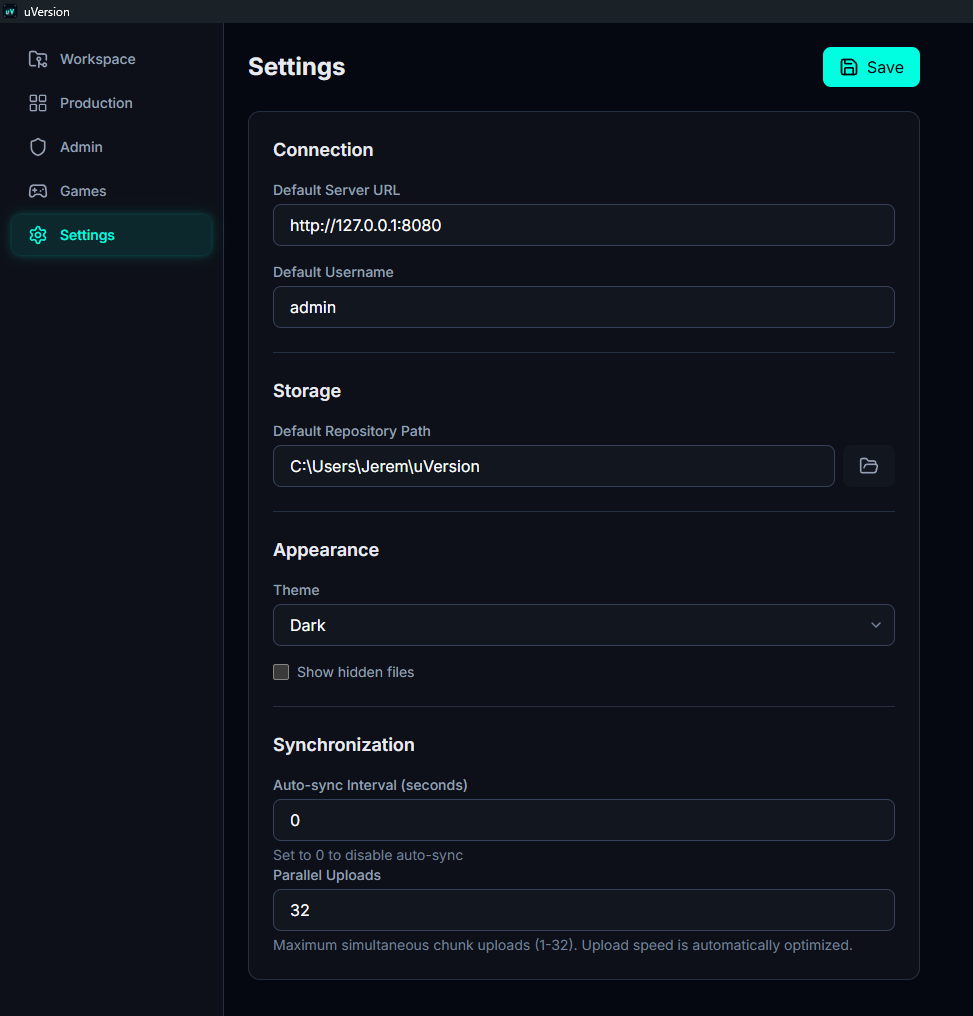
The Settings panel: theme, auto-sync interval, parallel uploads, default repository folder.

Global client preferences (saved in %APPDATA%/uversion/uVersion/config/config.toml):

SettingDescription
Default Server addressPre-fills the login page. Same split as at sign-in: fixed https:// prefix, host, port. May stay empty.
Default UsernamePre-fills the login page.
Default Repository PathFolder proposed by default when cloning.
ThemeSystem / Light / Dark.
Show hidden filesShows files starting with . in the Files tab.
Auto-sync Interval (seconds)A numeric field, not a dropdown, expressed in seconds and not in minutes. Minimum 0, and 0 disables automatic synchronization.
Parallel UploadsNumber of simultaneous uploads, from 1 to 32.
Parallel DownloadsNumber of simultaneous downloads, from 1 to 32.
Avatar colourYour colour in the interface (initials on board cards, locks, activity). Unlike the others, this setting is saved on the server side: it follows you from one machine to another and your teammates see it.

Unreal panel

The Unreal action bar: the green Plugin 1.0.5 pill, a folder icon, then Open Editor, Compile, Package, Publish Build, Sync, Status and a gear menu.

When the client detects an Unreal project in the workspace, a dedicated action bar appears at the top right of the Workspace. It drives the engine straight from the client: open the editor, compile, package, without going through an IDE. Most actions only concern C++ projects (a pure Blueprint project has no need to compile).

The .uproject is only searched three levels deep Detection relies on the .uproject file (the file that describes an Unreal project). The client looks for it at the workspace root and down to three levels of folders below. Any lower, it does not find it, and the whole Unreal bar disappears without the slightest message: no error, no warning, just missing buttons. If you see no Unreal action on a project that clearly is one, it is almost always this. Move the project closer to the workspace root.

The plugin status pill

At the far left of the bar, a pill shows where the Unreal plugin stands for this project. It is clickable:

PillWhat it means
Plugin <version> (green)The plugin is installed and up to date for your version of Unreal.
Plugin installed (green)The plugin has just been placed into the project.
Update ready (orange)A newer version exists. The client does not install it on its own: close Unreal, then click the pill.
Restart UE (orange)The Unreal editor is open. A loaded plugin cannot be replaced: close the editor and click again.
Set engine path (orange)The engine path is missing. Clicking opens the path picker directly.
Plugin n/a (orange)No binary is published for this combination of Unreal version and system.

Engine path

The Unreal install path is resolved automatically from the EngineAssociation of the .uproject (Windows registry, LauncherInstalled.dat, or a source build). This path is required for all the actions below, and the automatic resolution fails in particular on an engine compiled from source. Here is where to set it by hand.

1. Open the secondary actions menu

There is no input field, no Browse button, no Auto-detect button visible in the bar. The only entry point is the gear-shaped button, at the far right of the Unreal bar, next to a small chevron and whose tooltip reads More actions. Nothing in its look speaks of the engine, and that is why it is not found.

The More actions menu of the Unreal bar, open: Generate Project Files, Publish Editor Binaries, then Force Sync in red with the note overwrites local, and Set Engine Path... whose subtitle shows the current path or Not configured.

2. Choose Set Engine Path...

The Set Engine Path... entry is the last of the menu. Its subtitle shows the current path, or Not configured if there is none: it is the fastest way to know whether the problem comes from there. A folder picker opens, and the chosen path is saved in the workspace's .uversion/config.toml.

The symptom, when it is missing The Package button is greyed out and its tooltip becomes Set Engine Path first. The plugin status pill turns to Set engine path in orange, and clicking it opens the same picker directly.

Open Editor

Launches the Unreal editor (UnrealEditor) on the workspace project. The button is idempotent: the editor can take several tens of seconds to show its window (especially on macOS / Linux), so a second click during that time does not open a second instance. The button shows "Opening..." while the editor is launching. For a C++ project never compiled locally, opening the editor first triggers a project-files generation then a compilation (see Automatic actions).

Compile

The Workspace with a green BUILD SUCCEEDED banner and the integrated console showing Unreal Build Tool output.

Compiles the project (Unreal Build Tool). The output shows in real time in an integrated console. A C++ project must be compiled for the editor to open it and to reflect code changes.

Sync and Status

These two buttons live in the same bar, not in the Files tab:

  • Sync: updates the whole workspace from the server. Its tooltip states the number of pending files when there are any. It is the real "sync" of the client, not to be confused with the Download button of the Files tab, which only fetches the selection.
  • Status: refreshes the server-side state, other users' locks included, and updates the counter of the Sync button.

The More actions menu

The rarer actions are gathered behind the gear-shaped button, at the right of the bar (screenshot above):

  • Generate Project Files: regenerates the IDE project files (Visual Studio, Rider). Useful after adding or removing source files, or after a clone.
  • Publish Editor Binaries: compiles, then publishes the editor binaries matching the latest code commit. Your teammates fetch them at sync instead of recompiling each on their side. Absent on Linux.
  • Force Sync: re-downloads while overwriting your local files. Flagged in red in the menu, with the note overwrites local, and preceded by a confirmation. To be reserved for workspaces you accept to lose.
  • Set Engine Path...: the engine path setting, described above.

Package

The button is called Package; "Package Game" is only its tooltip, replaced by Set Engine Path first when the engine path is missing, the button then being disabled. It packages the game via RunUAT BuildCookRun and archives the result into Packages/{config}/ at the workspace root. Three configurations to choose from:

ConfigUse
DebugGameDebug build (full symbols, unoptimized).
DevelopmentDevelopment build (default): optimized but with the dev tools.
ShippingDistribution build: optimized, without the dev tools.

The Packages/ folder is ignored by default (.uversionignore): the packaged builds are not versioned, they are distributed via Publish Build.

Publish Build

Publishes a packaged build as an internal playtest version. It becomes downloadable by your team from the client's Games page (playtester role or build access granted). The client scans Packages/{config}/, uploads the files (deduplicated on the server side) then records the manifest.

Open project folder

Opens the workspace folder in the system file explorer (Windows Explorer, Finder, or xdg-open on Linux).

Stop

Cleanly interrupts all builds in progress: compilation and packaging. The button states how many builds were stopped (an auto-compile launched in the background may be counted in).

Automatic actions

In addition to the buttons, the client triggers certain Unreal actions on its own, so that a C++ project always stays up to date and compilable:

  • Before a check-in: if code files have changed, the project is compiled first. If the compilation fails, the check-in is blocked (you do not submit code that does not compile).
  • After a sync: if the sync downloaded code, the client regenerates the project files then recompiles.
  • On the first launch after a clone (C++ project): project-files generation then compilation, before you can open the editor.

These automatic builds serialize on the engine lock (Unreal Build Tool -WaitMutex): they do not refuse one another, they chain up. The Stop button interrupts them too.