uVersion
English
Download →

Wiki

Install on Ubuntu / Debian

The .deb package: the three questions, the data directory, offline install, backup and uninstall.

Ubuntu 24.04+, Debian 13+ (x86_64). Two commands, three questions.

Install

1. Download the package

From the machine that will host the server, in an ordinary session:

cd /tmp && wget -N https://uversion.io/downloads/server/uversion-server_latest_amd64.deb

The _latest_ URL always points to the most recent published version. The -N flag tells wget to re-download only if the remote file is newer: handy for updating without piling up .deb.1, .deb.2, etc. copies. cd /tmp avoids a cosmetic apt warning ("unsandboxed as root") when the .deb is in your home directory.

2. Start the installation

A single command, in the directory where you just downloaded the package:

sudo apt install ./uversion-server_latest_amd64.deb

The installer then asks three questions, in the order of the three steps below. They appear in a full-screen blue dialog: you move with Tab and confirm with Enter.

3. Answer: the data directory

Default: /var/lib/uversion. This is where the content of your versioned files lands, so it is the directory that grows, so the one you want on your large disk. Not every path is accepted: the Choose a data directory section gives the four rules, and the installer refuses by naming the rule you broke.

The Debian installer's first question, in a full-screen blue dialog: the data directory path, pre-filled with /var/lib/uversion.

4. Answer: put the database on the data directory too?

Default: no. This is the most consequential question of the installation, and this default has a cost you should know before leaving it as is.

This answer decides whether a single disk is enough to rebuild your server.

  • No (default): the PostgreSQL database stays in the system directory (/var/lib/postgresql), separate from your data. If the machine dies, the surviving data disk contains the file content, but no more revisions, no accounts, no locks and no permissions. This is not a server you restart: it is a heap of bytes.
  • Yes: the installer creates a dedicated database inside the data directory, and writes a recovery procedure there. A single surviving disk, plus PostgreSQL and this package, are then enough to rebuild the server on another machine.

Two trade-offs to know before answering yes. This database directory can only be reopened by the major version of PostgreSQL that created it, so a rebuild several years from now may require installing that version explicitly. And the disk then also carries the licence key, the JWT secret and the database password: treat it as a secret. This answer can be changed later with sudo dpkg-reconfigure uversion-server.

5. Answer: the activation code

Required, unless a licence is already present on the machine or on the disk chosen at step 3: in that case the installer tells you so in a dedicated message and does not ask the question, because an activation code is single-use and yours has already been consumed by the machine this disk comes from.

The field accepts three forms, which is your way out if the machine has no Internet: the short code UV-XXXX-XXXX-XXXX, an absolute path to a file containing your full licence key, or that full key pasted directly (a long string starting with eyJ). With the first form only, the installer contacts licence.uversion.io to exchange the code for the full key.

6. Note what appears at the end

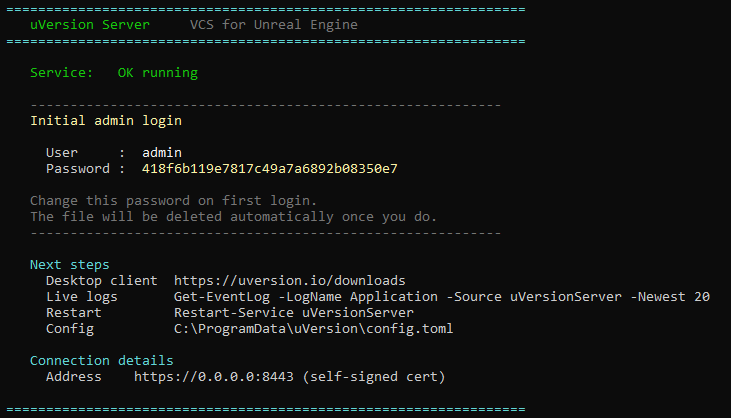
The installation ends on a colored box: admin username, temporary password, server address and certificate fingerprint. Note them down: the file that contains this password is deleted as soon as you change it.

The summary shown at the end of the installation: admin username, temporary password and server address.

You can then follow First login.

An interrupted installation can be restarted safely. If you close the window, if the network drops or if the installer stops on an error, simply rerun the same apt install command. Your activation code is not lost again: as soon as it has been exchanged, the key obtained is written to disk and reused on later attempts. And to revisit any answer afterwards, without reinstalling: sudo dpkg-reconfigure uversion-server. It is the universal catch-up command of this page.

Choose a data directory the installer will accept

Four rules. The first three are checked before your activation code is consumed, so a refusal costs you nothing: you fix it and start over.

  • Neither under /home, nor under /root. The server runs under a system account deliberately deprived of any access to personal directories: it could never read or write there, and would not start.
  • No space in the path. The path is copied as is into the service settings, where a space separates two values. An external disk mounted automatically under a name like /media/jean/My Book lands exactly on this.
  • An absolute path, that is, starting with /.
  • Every parent directory must let the uversion and postgres accounts through. This is the least obvious trap, and it does not show when you install as root: a parent directory created by hand and closed (for example a /perforce at root:root 0750, inherited from a Helix depot) lets the whole installation through, then blocks the service at the first access. The symptom is a service that refuses to start with status=200/CHDIR, or a "Permission denied" at the first write.

To check this last point before starting the installation, display the permissions of the entire chain of directories leading to your choice:

namei -l /srv/uversion        # remplacez par le chemin que vous voulez utiliser

Each line must carry an x in the last permission column (the one for "others"). If one is missing, the installer names the offending directory and the exact command to run, of the form sudo chmod o+x /le/dossier. It never itself modifies a directory it does not own: opening access on your tree is your decision, not its.

Where the files go

Two locations, and only one of the two follows you if you change the data directory.

In the data directory (the one from question 1): the content of your versioned files (under data/chunks), the TLS certificate and its fingerprint (under data/tls), the server identity (server-id, last-validated-at), the initial administrator password (initial-admin-password, erased as soon as you change it), the PostgreSQL database (pgdata) and the recovery kit (recovery) if you answered yes to question 2.

In /etc/uversion/, which never moves: the configuration file config.toml, the bare copy of the licence key (licence-key) and the database password (db-password).

Every command on this page uses <data-dir> in place of a hardcoded path, because that path is the one you chose. To read the real value on a machine already installed:

sudo sed -n 's/^WorkingDirectory=//p' /etc/systemd/system/uversion-server.service.d/10-data-dir.conf

Verify the installation

Three independent checks, to run in this order: the service runs, it listens, and it reported nothing.

1. The service runs

systemctl status uversion-server

Expected: active (running). Any other value sends you to troubleshooting.

2. The server listens over HTTPS on 8443

ss -tlnp | grep 8443

One line must appear. If nothing comes out while the service is running, it usually means TLS was disabled in the configuration: the server then falls back to plain HTTP and 8443 no longer listens at all.

3. The logs show no error

sudo journalctl -u uversion-server -n 50

journalctl is the system's log reader: this is where the server writes what it does, and the first place to look when something does not start.

Redisplay the certificate fingerprint

Replacing <data-dir> with the value read above:

sudo cat <data-dir>/data/tls/fingerprint

Redisplay the initial administrator password

As long as it has not been changed, it is still on the disk:

sudo cat <data-dir>/initial-admin-password

"No such file or directory" here means the password has already been changed: that is the expected behavior, the file is deleted at that moment.

Non-interactive and offline installation

Two different needs, one same mechanism: pre-fill the answers before running apt, so that no question appears. The system that stores these answers is called debconf, and it is driven from the command line.

1. Pre-fill the three answers

One line per question, exactly the three from the interactive installation:

echo 'uversion-server uversion-server/data-dir string /srv/uversion' | sudo debconf-set-selections
echo 'uversion-server uversion-server/db-on-data-dir boolean true'   | sudo debconf-set-selections
echo 'uversion-server uversion-server/licence-key string UV-XXXX-XXXX-XXXX' | sudo debconf-set-selections

2. Install without a dialog

With the answers already in place, the installation no longer asks anything:

sudo DEBIAN_FRONTEND=noninteractive apt install -y ./uversion-server_latest_amd64.deb

Offline variant: give the key instead of the code

On a network with no Internet access, the activation code cannot be exchanged: there is no one to reach. Retrieve then your full licence key from your account area on a connected workstation, drop it on the machine, and give the file path instead of the code, at step 1 above. It is the only way out, and it is provided for:

echo 'uversion-server uversion-server/licence-key string /root/uversion-licence.key' | sudo debconf-set-selections

The file must contain the key alone, on one line, with no quotes nor other content around it. A whole config.toml pointed to by mistake is refused explicitly. A third possible form, if you prefer not to drop a file: paste the full key directly into the value, in place of the path.

Back up before any risky operation

Three things to copy, and they are not backed up the same way: the database (accounts, revisions, locks, permissions), the data directory (the file content) and the configuration, which lives elsewhere and which is the one people forget.

1. The database

It is backed up as the postgres account, never as root: PostgreSQL has no "role" (its word for a database account) named root, so the command run directly as root fails with a message that looks like a breakdown whereas it is a matter of identity.

If you answered no to the question about the database (the default), it lives in the system cluster:

sudo -u postgres pg_dump -Fc uversion > /tmp/uversion.dump

If you answered yes, it lives in a separate cluster, which must be named explicitly, otherwise you back up the wrong one:

pg_lsclusters                                    # repere la ligne "uversion" et sa version
sudo -u postgres pg_dump --cluster <major>/uversion -Fc uversion > /tmp/uversion.dump

2. The data directory

Service stopped, for a consistent copy:

sudo systemctl stop uversion-server
sudo tar czf /tmp/uversion-data.tar.gz -C <data-dir> .
sudo systemctl start uversion-server

3. The configuration

/etc/uversion/ does not follow the data directory and is not in the database: it carries the licence key, the secret that signs sessions and the database password. Without it, a restore on a fresh machine starts over with a fresh secret, so the whole team is disconnected at once, and you have to request a licence again.

sudo tar czf /tmp/uversion-etc.tar.gz -C /etc uversion

Uninstall

Warning: these commands delete your repositories, the history, the user accounts and the configurations. Make the backup from the previous section first if you want to be able to go back.

1. Purge the package

The purge removes the binary, the service, the configuration answers, /etc/uversion/ and the uversion system account. It deliberately preserves the database and the data directory: these are your files, a package manager does not erase them behind your back.

sudo systemctl stop uversion-server 2>/dev/null
sudo apt purge -y uversion-server

Do not run sudo apt autoremove --purge after this uninstall. PostgreSQL arrived as a dependency of this package, so apt will offer to remove it, and its own purge erases all the databases on the machine, including those that have nothing to do with uVersion. The package sets up guardrails at installation, but the command remains one to avoid.

2. Follow the sequence the purge just printed

The database and the data directory are still there, and the commands to remove them depend on your machine: this is why they are computed and printed on screen rather than written here.

Read what the purge displays: the rest depends on your machine. The uninstall script looks at where your database really is, then prints on screen the exact sequence of commands for your case, paths and version number included. Follow that one rather than a generic recipe: an approximate command destroys either the wrong database, or nothing at all.

Two pitfalls this sequence avoids, and which explain why it is computed for you rather than copied from a guide:

  • A DROP DATABASE without naming the cluster targets the wrong database server. If you answered yes to the question about the database, yours lives in a dedicated cluster: the default command addresses the system cluster, finds nothing to delete, and lets you believe it is done.
  • An rm -rf of the data directory without first removing the cluster leaves a phantom database still declared to the system, which fails at every boot of the machine by demanding a directory that no longer exists. Order matters: pg_dropcluster --stop, then deleting the directory.

3. Remove the recovery kit

To do if the disk must leave your control (resale, end of lease, disposal): this directory contains your licence key, the JWT secret and the database password, and it survives the purge by construction.

sudo rm -rf <data-dir>/recovery

4. Make sure the system account is gone

It is normally already removed by the purge. The command has no effect if it has disappeared:

sudo deluser --system uversion 2>/dev/null || true

5. Check that nothing remains

Four checks, each with what you should read next to it:

systemctl status uversion-server         # "not-found" ou "inactive"
ls /etc/uversion 2>&1                    # "No such file"
id uversion                              # "no such user"
sudo -u postgres psql -tAc "SELECT 1 FROM pg_database WHERE datname='uversion';"   # (vide)